EliTR6 Posted April 25, 2020 Author Report Share Posted April 25, 2020 (edited) 14 hours ago, DavidBee said: Ok, that is what TR Bitz kindly did too, after a thorough wash down of the underside, as part of the deal, as well as replacing radiator hoses, braided brake hoses, handbrake cable, harness belts and mounts, Weber tuneup, distributor cap and leads, plugs, oil and air filters, oil change, diff oil and chassis greasing, new 175 15 tyres, fitting halogen headlamps, fitting new switches and Bob's LED conversion (this latter supplied by yours truly), reverse and fog lamps — and a set of 4 Landrover 6-inch spots from Rimmers also supplied by me. I forget what else. But I can't stand the waiting any more. As to the Vredesteins, I refer only to the 5 Trac, though, not the expensive Sprint Classics. I myself think they are over rated, though and looks have some sway, they are not everything. There are several never mentioned here which are better. I wish I had asked them to do the same before picking my car up from them! Was yours already in their workshop mid February? I'll post photos later but I've brushed down and degreased the chassis with bilt hamber surfex HD, rinsed it off, painted the rear half and am now between coats of hydrate 80 rust converter on parts of the front chassis that had some surface rust. I have to wait 24 hours before painting but at least I'll be done by the end of the weekend. She's a solid old girl but there are some small areas which will need attention a few years down the line. Ive got something dynax cavatity wax to treat the sills and chassis too. Edited April 25, 2020 by EliTR6 Quote Link to post Share on other sites
DavidBee Posted April 25, 2020 Report Share Posted April 25, 2020 (edited) 38 minutes ago, EliTR6 said: I wish I had asked them to do the same before picking my car up from them! Was yours already in their workshop mid February? I'll post photos later but I've brushed down and degreased the chassis with bilt hamber surfex HD, rinsed it off, painted the rear half and am now between coats of hydrate 80 rust converter on parts of the front chassis that had some surface rust. I have to wait 24 hours before painting but at least I'll be done by the end of the weekend. She's a solid old girl but there are some small areas which will need attention a few years down the line. Ive got something dynax cavatity wax to treat the sills and chassis too. I was in to test drive and bargain on same day, Saint Valentine's Day and my wife a wee bit put out. TR3 dark blue, Midnight blue or Winchester Blue, on sale there since 12 January 2019. They were often parked next to each other! Yours was on the rear ramp while I was there, and mine on the front ramp. I carried out an inspection of chassis and running gear and had a list written down, since I couldn't trust my emotions not to get the better of me. Shortly after I left TR Bitz, you arrived. KST 277 was more expensive, but the two cousin cars are same quality in my opinion when the work is done to VFF 989 it will be same price I think. When I saw your car, I had a really nice impression. For whatever reason, many sidescreen TRs seem so perfect that they "feel" remote, distant, more suitable for a museum. Yours looked neat and useable. Good panel gaps. Very nice! Edited April 25, 2020 by DavidBee Quote Link to post Share on other sites
EliTR6 Posted April 25, 2020 Author Report Share Posted April 25, 2020 50 minutes ago, DavidBee said: I was in to test drive and bargain on same day, Saint Valentine's Day and my wife a wee bit put out. TR3 dark blue, Midnight blue or Winchester Blue, on sale there since 12 January 2019. They were often parked next to each other! Yours was on the rear ramp while I was there, and mine on the front ramp. I carried out an inspection of chassis and running gear and had a list written down, since I couldn't trust my emotions not to get the better of me. Shortly after I left TR Bitz, you arrived. KST 277 was more expensive, but the two cousin cars are same quality in my opinion when the work is done to VFF 989 it will be same price I think. When I saw your car, I had a really nice impression. For whatever reason, many sidescreen TRs seem so perfect that they "feel" remote, distant, more suitable for a museum. Yours looked neat and useable. Good panel gaps. Very nice! Ha! What are the chances? I'm afraid I only had eyes for VFF when I was there. And I was knackered from the trip up! When will KST be ready? Quote Link to post Share on other sites
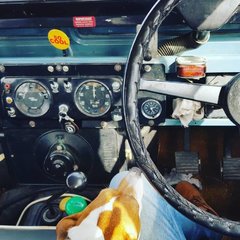
EliTR6 Posted April 25, 2020 Author Report Share Posted April 25, 2020 (edited) Rear before painting After Someone's a bit leaky Paint peeling off floorpan After a spot of hydrate 80 treatment Have to wait 24 hours for the rust stopper to do its magic. Will paint the front tomorrow afternoon. Edited April 25, 2020 by EliTR6 Quote Link to post Share on other sites
DavidBee Posted April 25, 2020 Report Share Posted April 25, 2020 Just now, EliTR6 said: When will KST be ready? That's the whole point. Bar a few smallish things — relay/extended fuse box, solid badge bar, replacement raided fuel lines (at my expense, at this late stage), rear fire wall and safe air filters — KST 277 awaits collection, as soon as lockdown is over. Performance was top of the agenda, reliability too, but safety must not be ignored, at least, to the extent that it is possible to make a sidescreen TR safe. I remember an aero engineer saying that he treated his car in the same way as the aero industry treats planes. Systematic maintenance and parts replacement. Not waiting for things to go wrong. Quote Link to post Share on other sites
EliTR6 Posted April 25, 2020 Author Report Share Posted April 25, 2020 (edited) 9 minutes ago, DavidBee said: That's the whole point. Bar a few smallish things — relay/extended fuse box, solid badge bar, replacement raided fuel lines (at my expense, at this late stage), rear fire wall and safe air filters — KST 277 awaits collection, as soon as lockdown is over. Performance was top of the agenda, reliability too, but safety must not be ignored, at least, to the extent that it is possible to make a sidescreen TR safe. I remember an aero engineer saying that he treated his car in the same way as the aero industry treats planes. Systematic maintenance and parts replacement. Not waiting for things to go wrong. I'm looking forward to the great reveal! What's the spec? Edited April 25, 2020 by EliTR6 Quote Link to post Share on other sites
DavidBee Posted April 25, 2020 Report Share Posted April 25, 2020 11 minutes ago, EliTR6 said: I'm looking forward to the great reveal! What's the spec? 2,200cc. I am not certain, but I think it must have a replacement TR4 engine (engine no. painted over). Beaided Goodridge brake lines, Girling disc conversion, Girling rear axle and differential, worm and peg steering (first fitted rack & pinion, then has been restored to rebuilt box whic feels great), rad without hole replaced by recored rad with hole, 2-inch s/s, single box exhaust and 4-into-1 exhaust manifold, no heat shiel or wraps or air duct, DCOE Weber 45s, rally cam, aluminium finned rocker and oil sump, spin on oil filter, 4A clutch and gearbox, A-type Laycock De Normanville overdrive, Lumenition electronic ignition, Moss 13-row oil cooler, and braided hoses, Racetorations fibreglass oil catch tank, nitrided crank, reinforced chassis, roll cage, 15-inch alloy wheels, narrow belt pulley conversion, Motolita steering wheel with smaller radius and thick leather grip, standard horn boss, alternator and new starter motor. Hardly any of this informaion was on the ad, by the way! Quote Link to post Share on other sites
BlueTR3A-5EKT Posted April 25, 2020 Report Share Posted April 25, 2020 (edited) 1 hour ago, EliTR6 said: Rear before painting After Someone's a bit leaky Paint peeling off floorpan After a spot of hydrate 80 treatment Have to wait 24 hours for the rust stopper to do its magic. Will paint the front tomorrow afternoon. How Is the front to back handbrake cable held towards the middle of the car, is it by the original spring or some clip? If not held towards the middle of the car it may drag on the road or rub a hole in the side of the rear brake hose. Peter W Edited April 25, 2020 by BlueTR3A-5EKT Quote Link to post Share on other sites
EliTR6 Posted April 25, 2020 Author Report Share Posted April 25, 2020 (edited) 13 minutes ago, BlueTR3A-5EKT said: How Is the front to back handbrake cable held towards the middle of the car, is it by the original spring or some clip? If not held towards the middle of the car it may drag on the road or rub a hole in the side of the rear brake hose. Peter W Hi Peter, there's neither spring nor clip. It's on my never ending list of small jobs to figure out later. Edited April 25, 2020 by EliTR6 Quote Link to post Share on other sites
BlueTR3A-5EKT Posted April 26, 2020 Report Share Posted April 26, 2020 There should be a small tag on the joint between tunnel and rh floor that the spring clips into. Moss list the spring cheers Peter W Quote Link to post Share on other sites
DavidBee Posted April 26, 2020 Report Share Posted April 26, 2020 20 minutes ago, BlueTR3A-5EKT said: There should be a small tag on the joint between tunnel and rh floor that the spring clips into. Moss list the spring cheers Peter W I would do the seams, ie. where the bottom of the panels meet the sills and front and rear panel lips (high impact areas). Even if not rusted, a fresh dose of Waxoyl for good measure will be a preventive measure. Quote Link to post Share on other sites
EliTR6 Posted April 26, 2020 Author Report Share Posted April 26, 2020 I just need to paint the chassis where its sitting on the lift pads but other than that... Mission accomplished! Quote Link to post Share on other sites
EliTR6 Posted April 26, 2020 Author Report Share Posted April 26, 2020 (edited) 5 hours ago, DavidBee said: I would do the seams, ie. where the bottom of the panels meet the sills and front and rear panel lips (high impact areas). Even if not rusted, a fresh dose of Waxoyl for good measure will be a preventive measure. I've got 2 big cans of dynax uc to spray the underside with. I still need to order some dynax s50 for inside the sills. Edited April 26, 2020 by EliTR6 Quote Link to post Share on other sites
EliTR6 Posted April 26, 2020 Author Report Share Posted April 26, 2020 Does anyone know where I can find center caps to protect the front dust covers and rear axle nuts? Thanks! Quote Link to post Share on other sites
EliTR6 Posted April 26, 2020 Author Report Share Posted April 26, 2020 (edited) 5 minutes ago, EliTR6 said: Does anyone know where I can find center caps to protect the front dust covers and rear axle nuts? Thanks! https://www.raceways.co.uk/Push_Thru_Metal_Hub_Caps.htm I've found these. Anyone know the exact size needed? Cheers Edited April 26, 2020 by EliTR6 Quote Link to post Share on other sites
EliTR6 Posted April 29, 2020 Author Report Share Posted April 29, 2020 (edited) Hi all, I'm ordering my relays and a switch for rewiring the fan. (Also relays for headlights. Car is negative earth but don't think it matters for this question. New loom and LED flasher / brake conversion from Bob also on the way) Quick question, what do you think of this diagram I found online, specifically the manual and thermo switches being wired to the negative side of the relay? Would also add a fuse to the warning light circuit. Thanks Edited April 29, 2020 by EliTR6 Quote Link to post Share on other sites
RobH Posted April 29, 2020 Report Share Posted April 29, 2020 That looks fine for negative earth (the diode would have to be reversed for positive earth). No fuse is really necessary for the lamp. Where you pick off the 12v for the relay depends on whether you want the fan to go off with the ignition, or whether you want it to be able to over-run after stopping the engine, until it is cool. If the former then you could take power from where the green wires go on the fuse box (switched live), if the latter then just link 86 to 30 on the relay. (If you do that though, make sure you don't leave the manual override switch on, else the fan will never cut off ). Putting the switches in the earth line is fine and might make the wiring up a bit simpler. Quote Link to post Share on other sites
EliTR6 Posted April 29, 2020 Author Report Share Posted April 29, 2020 3 minutes ago, RobH said: That looks fine for negative earth (the diode would have to be reversed for positive earth). No fuse is really necessary for the lamp. Where you pick off the 12v for the relay depends on whether you want the fan to go off with the ignition, or whether you want it to be able to over-run after stopping the engine, until it is cool. If the former then you could take power from where the green wires go on the fuse box (switched live), if the latter then just link 86 to 30 on the relay. (If you do that though, make sure you don't leave the manual override switch on, else the fan will never cut off ). Putting the switches in the earth line is fine and might make the wiring up a bit simpler. Thanks. Simple works best for me! I'm going to wire in a seperate tr6 fusebox straight from the battery or alternator to power the relays for the lights and fan. I have a battery cut-off that I use to disconnect the battery as soon as I turn off the ignition so I'm not worried about the fan running with the engine off. Quote Link to post Share on other sites
EliTR6 Posted April 30, 2020 Author Report Share Posted April 30, 2020 I'm putting together my order for the electrical bits and bobs. I'm planning to use 4mm2 for the alternator to revington 4 way connector and fusebox, 2.5mm2 wire for headlights, fan and horns and 1.5mm2 for everything else where I need to add to the loom For ease of installation and peace of mind, I want to swap all bullet connectors for non insulated crimp on 6.3mm spade terminals with heat shrink. Not a big fan of flashy plastic colours in my engine bay Is it ok to take the live feed from the battery +ve terminal for my 2nd fusebox powering lights anad fan? Is this a sound plan? Thanks Quote Link to post Share on other sites
Lebro Posted April 30, 2020 Report Share Posted April 30, 2020 (edited) If you do that the ammeter will not show the current drawn by these things. Better to take it from the alternator o/p. (Or A / A1 connection if you have retained the regulator box) Bob Edited April 30, 2020 by Lebro Quote Link to post Share on other sites
EliTR6 Posted April 30, 2020 Author Report Share Posted April 30, 2020 1 hour ago, Lebro said: If you do that the ammeter will not show the current drawn by these things. Better to take it from the alternator o/p. (Or A / A1 connection if you have retained the regulator box) Bob Thanks Bob. The ammeter is currently not wired in but that can be sorted. Everything else make sense? Cheers Quote Link to post Share on other sites
EliTR6 Posted April 30, 2020 Author Report Share Posted April 30, 2020 (edited) Couple of questions Can I run the fan override and thermostatic switch off the same live feed? Can I power the high and low power circuits for the horns off the same fuse? I might be better off taking the power for the aux fusebox from the 4 way connector block Thanks! Edited April 30, 2020 by EliTR6 Quote Link to post Share on other sites
RobH Posted April 30, 2020 Report Share Posted April 30, 2020 Yes and yes. Quote Link to post Share on other sites
EliTR6 Posted May 2, 2020 Author Report Share Posted May 2, 2020 On 4/30/2020 at 10:26 PM, RobH said: Yes and yes. Thanks! I've started cleaning up the carbs, I'm expecting a rebuild kit to arrive this week. Any ideas what this spindle disc mod is? Quote Link to post Share on other sites
BlueTR3A-5EKT Posted May 2, 2020 Report Share Posted May 2, 2020 Yes it is sealing the emission run on valve into the butterfly. I simply cut the valve assy out with a pair of side-cutters then soldered up the holes, file the solder flat to the butterfly it will leave a bigger venturi than you have currently around the butterfly. You have waxstat controlled jets on those carbs. Worth getting rid of for standard jets as they cause lean running when the engine gets hot - think lumpy tickover and cutting out as you creep in heavy traffic. What rebuild kit did you order? Cheers Peter W Quote Link to post Share on other sites

Recommended Posts
Join the conversation
You can post now and register later. If you have an account, sign in now to post with your account.