


TomMull
-
Content Count
557 -
Joined
-
Last visited
Content Type
Profiles
Forums
Calendar
Posts posted by TomMull
-
-
On 3/3/2023 at 7:01 PM, OldBob said:
I guess its the way you adapt to drive then Mick, doing 5mph plus in my basic 90bhp TR2 with its original 3 synchro box is fine in 2nd gear, wouldn't need to change down. I remember when being taught to drive you were expected to control the car right down to walking speed in 2nd, not 1st.
Bob
On 3/5/2023 at 3:47 AM, John McCormack said:Me too. I've never needed to put the car into 1st when moving.
My TR3 had a TR4 gearbox with overdrive when I bought it. It leaked oil badly and popped out of second occasionally. I replaced it with a Tr3 gearbox that I had on hand. No leaks, much quieter and stays in all the gears.
I do plan to rebuild the TR4 gearbox at some point but no hurry as I'm quite pleased with the original non OD non synchro one. The lack of first gear synchro is a non issue with me but I do admit that I rarely drive on expressways so I don't miss the OD either.
Tom
-
I'm trying to identify the Girling master cylinder on my 1973 USA spec GT6 (KF22288U).
I don't know if the cylinder is original.
Here is what I have:
Casting # 646767 B (possibly 8) 03
Green tag # 6868 010N60/40 19HF
The number on the green tag is 6868 010N60/40 19HF. Since I measured the bore at 6874 with my cheap HF caliper, I'm guessing that the 6868 on the tag is the bore (.6868 or 11/16). Am I correct? I think other GT6 masters are 5/8
My standard 3/16 tube nuts fit the ports.
While the bore seems to be consistent, the front and rear pistons seem to be slightly different diameters. Can that be right? The rear piston, which is the one that doesn't pump is smaller.
Your thoughts appreciated.
Tom
-
When I bought my TR3 (a post 60K), in 1964, it had it's original rubber floor mats. Perhaps carpets were optional? I added carpets some time later. I used no glue at all. There were clips on the inside of the front foot wells that held the front edge of the carpets. The clips were in place although the carpets were not. The seat rail fasteners held the back of the front carpets and the front of the rear pieces. I used jute underneath which I think came with the carpet set, which turned out to be a bad idea. Otherwise just gravity. There was a finished edge that butted the sill “kick plate”, which made it easier to remove the carpets, which I did many times over the years.
Not sure if any of this was "original".
Tom
-
2 hours ago, RobH said:
You are lucky Tom. I've had four punctures over the past ten years, all from screws/nails dropped by someone. The builders and handymen here seem to distribute them liberally.
Rob,
Just to clarify; I didn't say I had no tire repair. I built a house and a garage on my land and have an abundance of nails and screws in my gravel driveway. The difference is that those punctures created slow leaks, all detected by visual inspection or pressure checks. None required the spare, which I should have said initially. All were repaired with a plug and none required a change with the spare. I do admit that I have tubeless tires on the TR3 and it might be different if you still have tubes.
Tom
-
I'll skip the forum search part and comment on tyres (tires). I've been driving for more than 60 years and I recall only 2 occasions when I changed a tire on the road. Even if I've forgotten some, suffice to say those were rare occurrences, and due to neglect on my part for failing to monitor pressures and driving with tires that had outlived their usefulness. I can think of no tire changes on the road in the last 30 years. So do I even need a spare? Of course the spare is part of the character of the car with its leather strap and all.
But for practical purposes we have the bicycle pump or the electric electric version, cans of "fix a flat" and the cell phone. And I don't know of many places or roads here in America where one could safely change a tire.
Foe esthetic purposes, put a tire without a rim in that compartment. Otherwise put your rag top in there with a decent tool kit. Too bad the sidescreens wont fit.
Tom
-
Looks like a TR3 gearbox with OD, maybe later than your car by the TS 77093 serial number in your picture (if that is what it is).
-
Sorry, forgot the picture
-
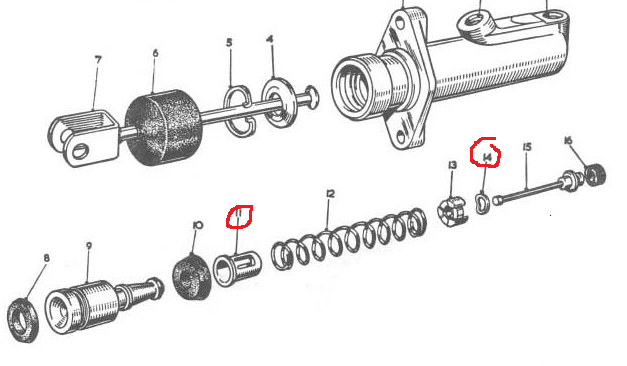
My clutch was ab bit slow to engage but worked otherwise so I decided it was time for a rebuild. The little wave washer on the inner end of the clutch master cylinder was completely flat, no wave in it at all. I don't know if that was my problem but the problem now is finding a replacement. They seem to be quite scarce. Lots of the catalog pictures show the part but after getting a couple of kits without the washer, I find that they have been eliminated from most kits. (I do have some used ones from old cylinders but would prefer new.) Anyone Know of a source and did that washer cause my problem? I also polished the bore as well as I could and will switch back to DOT4 from Dot 5.
I don't know how many times one can bent the tab on the thimble (11) and the hole for the pin is not getting any smaller. Those are not available either. Of course there is the whole new unit route, cheap and easy, but that idea is not appealing.
Tom
-
Agree. It would be even better if it had the rear window. Macy's over here has them but pricey at $595. I did a barely passable job polishing my old faded one.
Tom
-
The only problem I've had is getting the bulb out of the housing after 50++ years. They tend to get stuck and I tend to get impatient and break the capillary seal.
I agree the electric makes the dash removal simpler but how often do you need to remove it?
Tom
-
At the risk of being a day late and a dollar short, or in this case several exponential factors of the quip, I might add that no one has asked jir what gearbox he has. If it is the early non-synchro box and it seems to me that it is, then that bracket will not fit without some modification. The lack of a half inch or so in the length of the TR3 gearbox, as compared with the all synchro TR4 box, for which the bracket is designed causes the exact problems jir has expressed.
Tom
-
Thanks Rob, good to know. I've a stuck piston on one of the A calipers on the car and a pair of B calipers on the shelf.
Tom
-
Can I swap type B calipers for type A? By commission # 58XXX, it looks like I should have the B type anyway but my car came to me with the A type on it.
Tom
-
I had a similar problem which turned out to be a plugged rubber hose. Tom
-
So I guess I'll continue this as there turned out to be other issues. After installing a fuel cock and re-piping most of the system with the correct nuts, olives and pipes I failed to stop the slight leak at the pump connections. When I swapped the pump for another, using the same tubes, nuts and olives the leak went away. The second pump, a newer but used one, does not have a primer so I'd like to use the original.
So like the old faucet that needs the seat reground, is there any way to fix the pump? The seats do look a bit rough. Perhaps fixing an olive on a piece of straight tube (solder?) and spinning in a drill with grinding compound? I do not see anything that looks like a crack but probably should get some crack detection dye. Other ideas?
Tom
-
For those of us who wish to retain the original fuel pump and to replace the shaft seal, which raises the cost of the kit by a factor of 3 or 4, I would advise a very close examination of the shaft end. Mine was crudely stamped and had rough sharp edges around the end that needs to be forced through the seal. The old shaft end was quite smooth. I'm sure others have noticed this but I didn't find it mentioned. A few minutes with a file and abrasives would be advisable.
Having rebuilt quite a few pumps in the past, this is the first time I've replaced that seal. Perhaps not necessary?
Tom
-
While the exhaust guides are pretty much flush on the inside of the port, the intake comes through at a considerable slope in the port and protrudes more than a quarter inch on one side. Best to use the tops as reference as the TR4 manual indicates, imo.
Tom
-
15 hours ago, Ralph Whitaker said:
Is it not machined where the spring seats? Mr Haynes states measure the height of the guide from the spring seat before removal and insert the new guide to the same depth, but in the specs quotes 0.780 for the TR4, but nothing for the TR3.
Ralph
You are right Ralph, on closer inspection and cleaning of my ancient head, that spring seat does seem to be a machined surface. Tom
-
Apparently this is not listed in the TR2-3 Factory Service manual but the TR4 manual says "Valve guide protrusion above the top face of the cylinder head - 0.78 in (19.84 mm)." Mine varied from 19.64 to 19.73 mm. I'm not sure what the top face refers to and I measured mine to the surface next to the guide, which is a cast and not a machined surface so it does not seem that they were looking for precision.
Tom
-
Mine protrude just shy of 3/4 inch, measured with a rule. I've always had the machine shop put them in so I trust they have them right. I have not measured them with an accurate instrument but can do if necessary.
Tom
-
1 hour ago, DesNoble said:
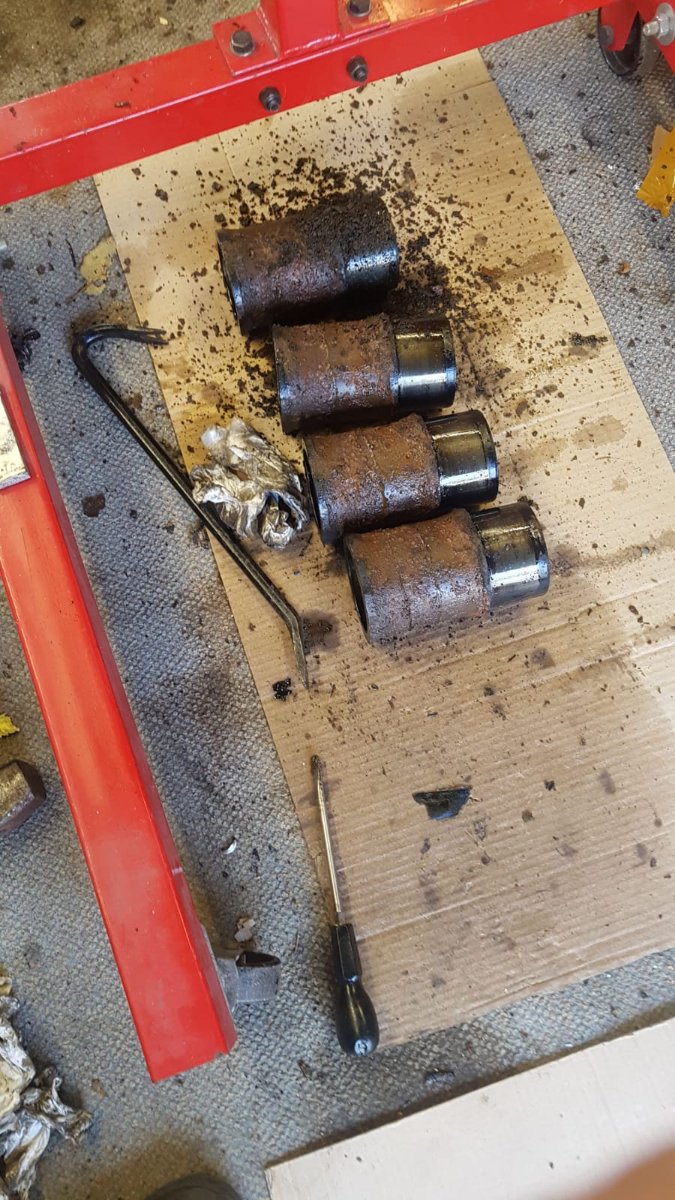
I couldn't move mine using a block and 4lb hammer so I had a plug made up at my local machine shop. Cost a bit but the liners then came out easily. Don't worry about damaging the liners as you will have to replace them anyway. I ended up with 87mm pistons and liners from Racetorations as the first set I got of std 86mm from another supplier were rubbish and one split. The plug I got made is for 86mm liner so that is what the step is.
Des.

Handy tool Des but it looks to me like the block Des has is like mine with the pistons stuck in the liners and the liners stuck in the block. One has push on the rods as they can't be removed with the pistons stuck. Hopefully that's not the case with Des' but if it is it can be done.
Tom
-
On 2/1/2021 at 5:11 PM, Lebro said:
1st step apply penetrating fluid (or diesel) into the bores to loosen off the pistons.
Remove sump, big end & main caps (keep the big end caps in order), & crankshaft. A simple tool for removing the rear main bearing cap is shown in the workshop manual.
Using a suitable lump of wood & a large hammer drift the pistons downwards & out (hopefully)
invert the block & using a larger lump of wood & large hammer drift the liners downwards & out.
Mine came out with a shower of rust !

Bob.
It becomes somewhat of a challenge if the crank won't turn. It is then extremely difficult to get at all the big end nuts. Mine also took more than a block of wood and I even failed with an iron pipe with a bronze cap on the business end. A 50 ton press did the trick but broke one of the cylinder liners. The block turned out to be OK. Tom
-
I carry the original jack but can't remember the last time I used it. Hopefully I'll remember how it goes if I should need it. Virtually all the jacking I do is in or near my garage where I use a low profile floor jack.
Tom
-
I used jute glued to the top of the tunnel with bolts exposed for removal. Also glued jute in the foot wells but no glue on floors. I think that's what it had originally but my car came with rubber mats instead of carpets and nothing underneath. I don't think any of it made a difference.
Tom

Mystery RHD steering box
in TR2/3/3A/3B Forum
Posted
No idea really but it does look a bit like an XK120 box.
https://advantagesteering.com/jaguar-xk120-steering-gear-box-1949-1953-oe-remanufacture-and-return-service/
Tom