


johnw
-
Content Count
49 -
Joined
-
Last visited
Content Type
Profiles
Forums
Calendar
Posts posted by johnw
-
-
Hi Mike, I think the trade name is Foamex. If you look on Ebay you'll find it.
I made mine over 30 years ago when I was restoring my car. I bought an 8x4 sheet from a local supplier. As for fixing I fitted 3 brass studs around the wheel arch and used penny washers and brass nuts to hold them in place. I also made separate pieces to cover the toe board at the front and to protect the rear valance at the back. They have been in place for the last 30 years without problem.
John.
-
Hi Mike, I made mine using 3mm foam board. You don't need anything as flexible
as your photo shows. Because I was carrying out a rebuild at the same time I
Was able to put the fixings in without damaging anything.
John
-
Free steel surrey roof in need of a great deal of repair work.
Collection only from B72, Sutton Coldfield, West Midlands.
Regards
John.
-
I fitted one of these about 2 years ago and have just noticed it has started leaking from under the top plate.
Has anyone else had this problem?
John.
-
Don Hoods in Birmingham will do you one as well, just ask them to leave the front edge unfinished.
They advertise in TRaction.
John
-
Hi every one, just to show there are many ways to skin a cat, here is my effort at fitting a surrey top to a TR6.
The front is fitted to a late spitfire header rail with no other poppers. Also no popper at the side centre section.
At the rear I have used a Tenax fastener each side.
The front H frame is cut to length and bolted to the header rail, which creates a rigid front half of the frame.

The rear rail is held in place using these quick release catches as suggested by another member some months ago.
The centre section of the hood is left secured to the H frame.
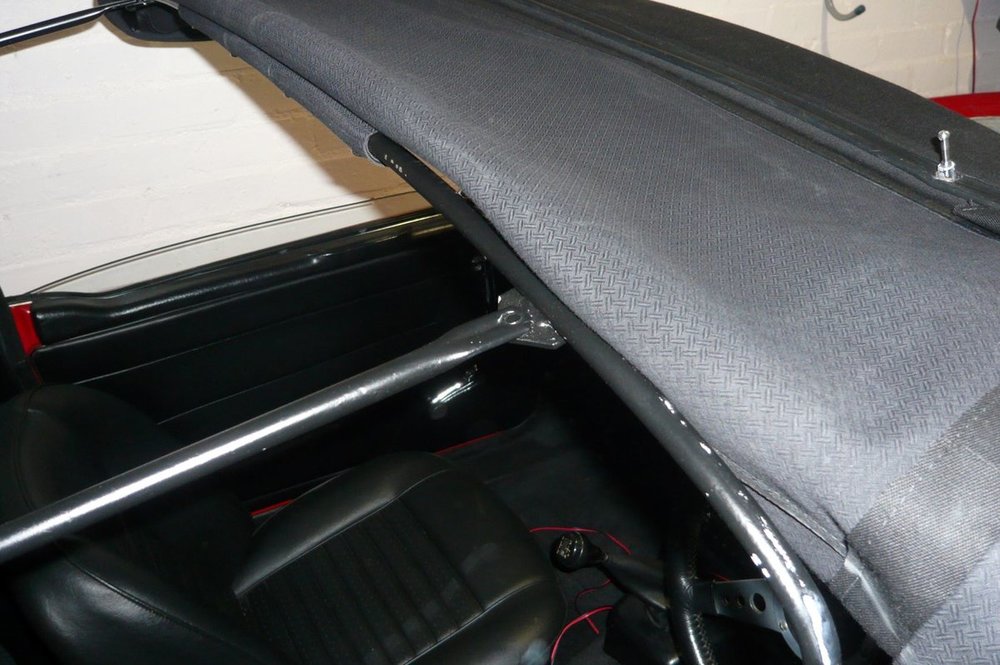
When the rear legs are folded against the centre rail and the hood folded over the whole assembly fits very neatly into the bottom of a TR6 boot
IF you replace the boot rear liner with a non Pi item. My pump is under the floor so there is no need for the board to cover the pump.
Hope this make sense.
Stay safe.
John W
-
47 minutes ago, Upriis said:
Following with interest as I was also just about to order the unfinished Surrey soft top from Skinners, along with their boot trim kit.
My tr4 is already fitted with a tr6 soft top for summer and honeyborne surrey hardtop for winter, so have the required frame fittings.
Just need to source a spare complete tr6 header rail for the new Surrey soft top.
I used a late Spitfire rail, they were easier to find and much cheaper than a TR6 frame.
John
-
Thank you all for the replies.
I'll have a closer look at it and see if I am up to the challenge.
Regards
John
-
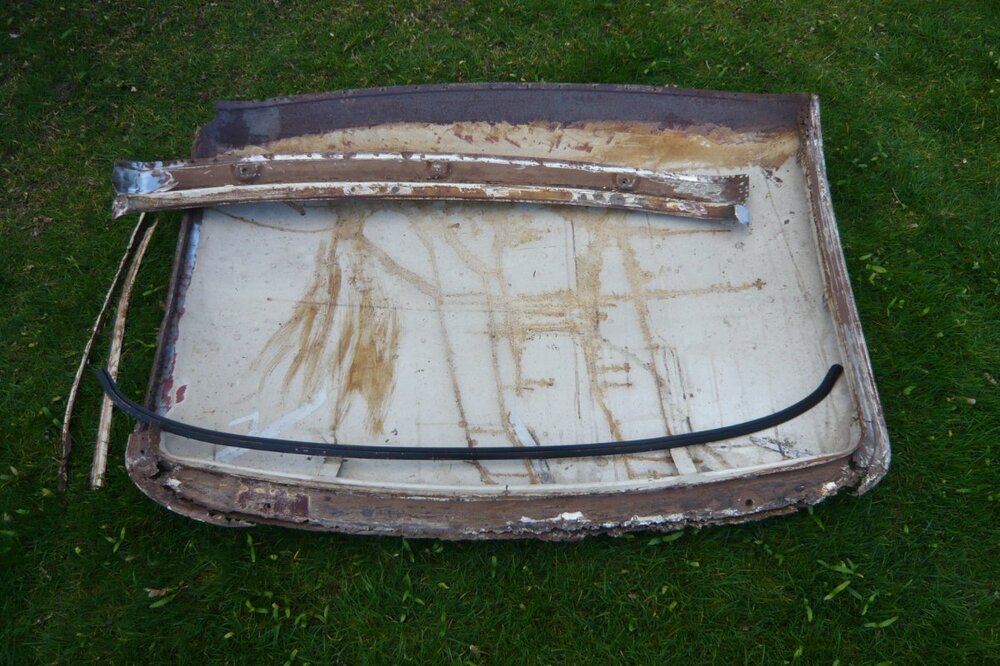
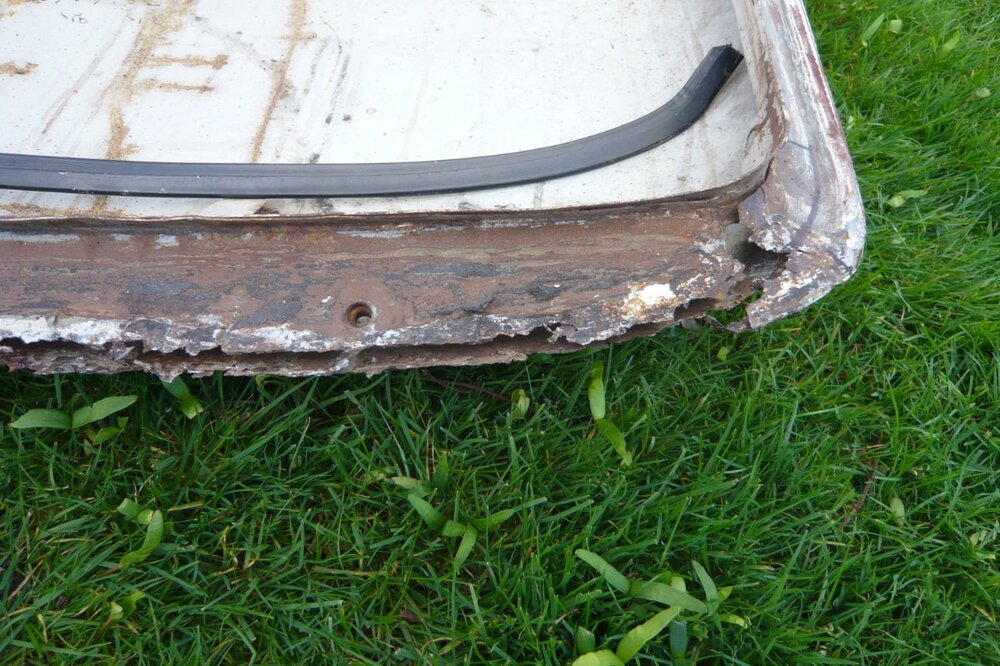
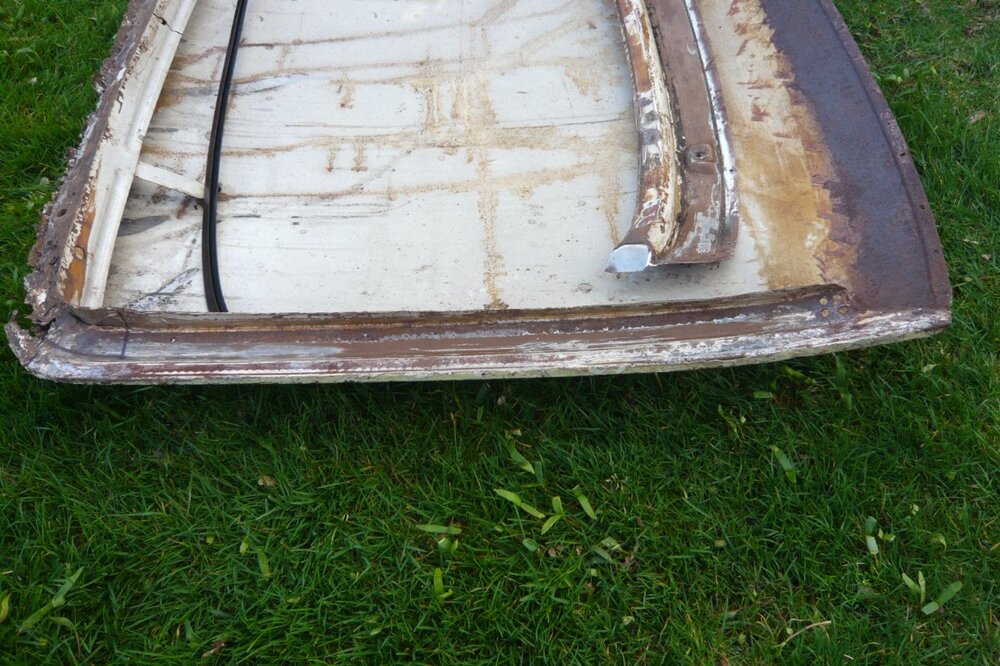
Hello everyone I hope we are all keeping safe and well.
In my shed I have a steel surrey roof in need of repair, now seems a good time.
The front edge is completely rusted away and has been bodged with filler, also the two rear corners have holes in.
The rest does not seem too bad but it's early days.
My question is are there any repair panels available or is it a matter of lots of bits welded together,
it's quite a complex compound curve at the front and i'm not sure my skills are up to it.
The GT6 has a similar shape so perhaps a panel has been made for that.
Anyway I would be grateful for any help
Many Thanks
John
-
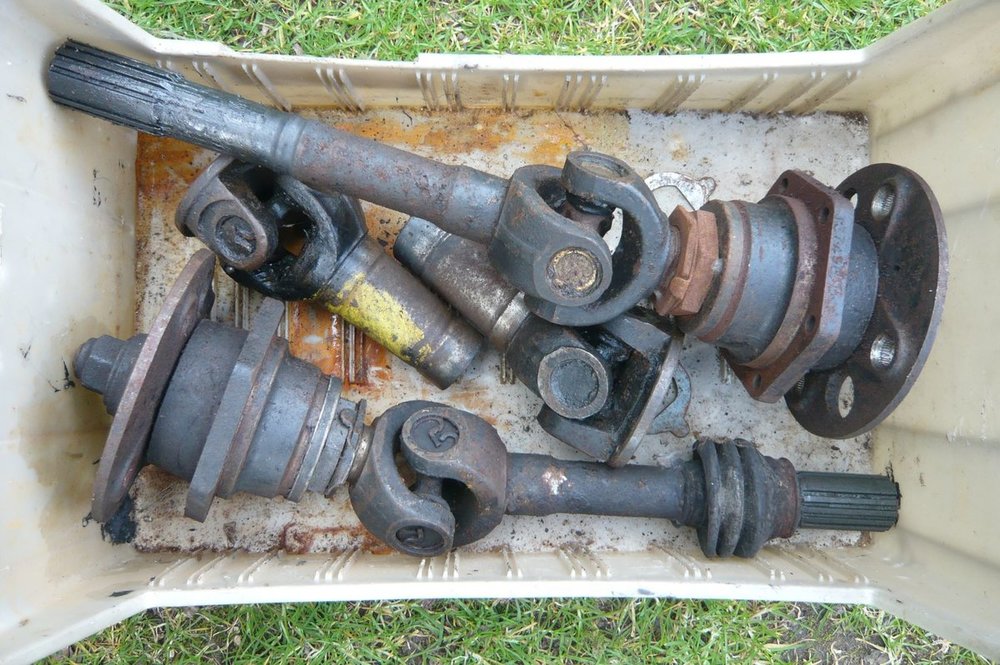
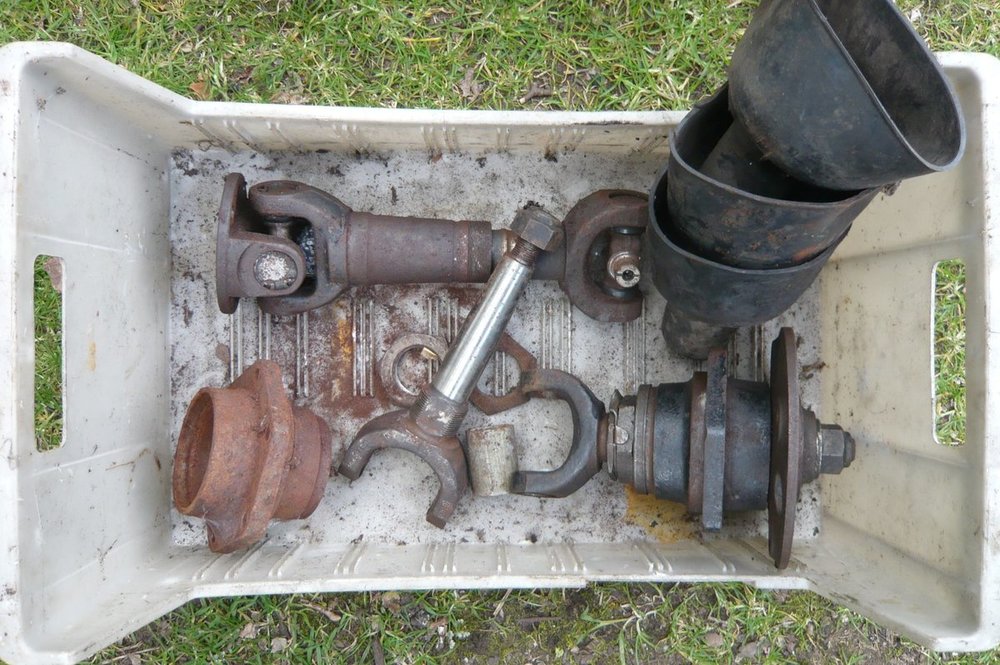
Hi, having a clear out in the shed.
Have 3 IRS rear hubs. Two are off a 2.5 PI I think, third is from a TR.
But I think all the hubs are interchangeable. All 3 hubs rotate but one sounds a bit gritty, UJ's feel ok.
Been in my shed for the last 30 years, came from a scrap yard.
Free, collection only, from Sutton Coldfield, B72.
If anyone wants them I can leave them at the end of my drive for collection.
Regard
John
-
Hi, do you have electronic ignition fitted. I had a similar situation whilst sitting in traffic.
Found the electronic ignition to be faulty. Went back to points, seems ok now.
Regards John
-
Just a thought, could it be a bit of play in the diff?
I think the movement is to easy to be the wheel splines.
I'm in the process of fitting CV shafts to my TR6, so fingers crossed.
John
-
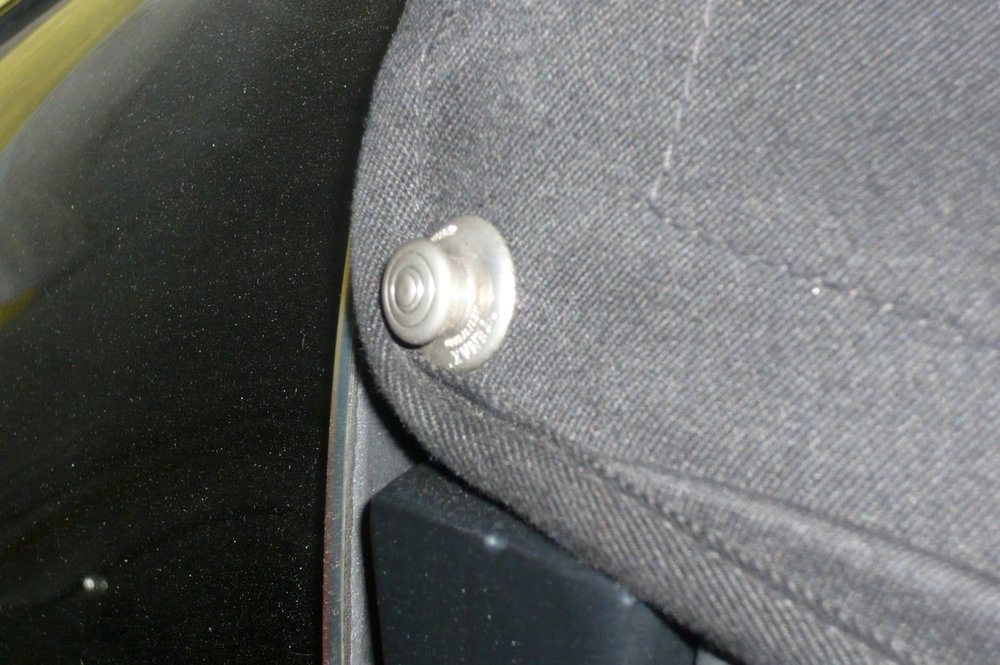
Hi Mike,
you need to make a small mounting plate, I used 2mm aluminium.
Firstly I removed the steel insert and drew round the outer profile onto a piece of 3mm hardboard.
Cut this out and drill the two mounting holes and a 20mm hole in the centre.
Fit the fastener to this and fix back into the surrey frame. You can then juggle this around untill you are happy with the position.
Once happy you can use this as a template to mark out the aluminium, I then covered this with vinyl to blend in better.
The pins are more tricky. They are M6 so I ran a 1/4 UNF die down them, but because M6 is smaller than 1/4" they are not a good fit into the rear bar.
I have bought some 1/4 UNF SS bolts and in the process of making some new pins.
Hope this helps.
John
-
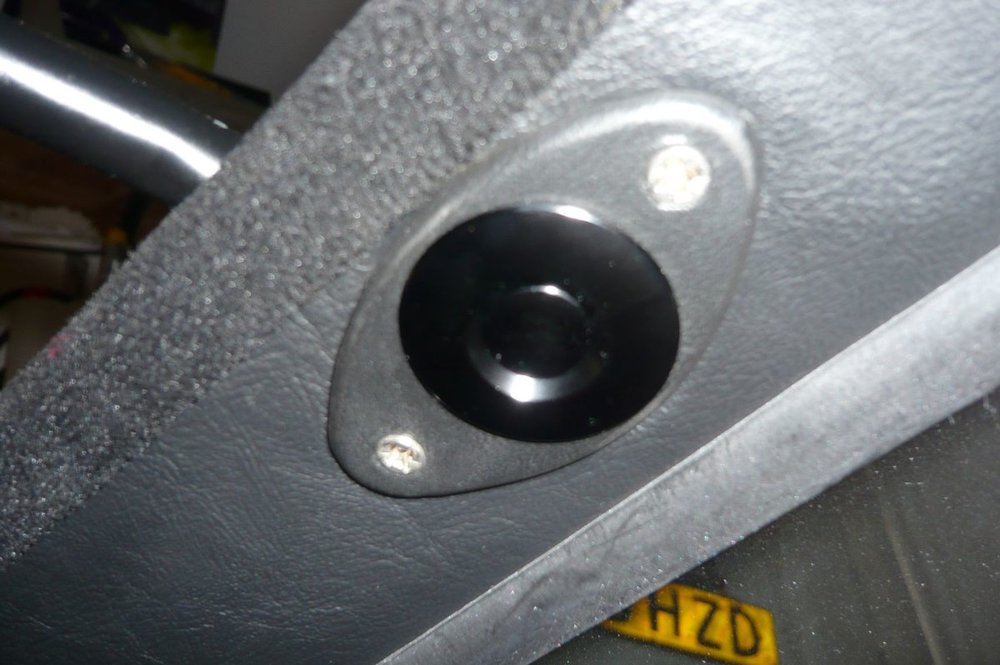
On 11/21/2019 at 10:02 AM, Andy Moltu said:
There is a better mod to the back rail.
Uses these Click fasteners.
Put the two catches in the rear frame and the pins in the back of the hood. These are metric so either re-tap the stiffener or turn a nipple on the end of a 1/4 uni set screw.
The rear hood then just clicks in. To release press the buttons on the fasteners. No messing aligning nuts when it is raining.
The other mod is to attach the front of the hood to a TR6 header rail. This is more complicated in that the frame needs modifying as the original fits there 6 the header rail attaches and the top of the screen frame may need modifying to take the fixings unless it already has a 6 screen frame. As yours is a 250 you probably already have the correct mounts.
Bought a couple of these click fasteners as Andy suggested and they work a treat.
Much easier to fit than the thumb screws and look quite neat from the inside too.
I've already carried out the header rail mod but I used a late Spitfire header rail.
With these two mods fitting the Surrey top is much quicker and more secure.
Thanks for the heads up Andy.
John W
-
That's a shame, but thanks for the info John.
Regards,
Another John
-
On 11/20/2019 at 7:28 AM, John Morrison said:
Now all sold except the two chrome wheels, anyone want one to upgrade a spare from painted?
John.
What size are they John, how many spokes? Would they be OK for a TR6?
Thanks
John.
-
Hi Sean, sorry for the late reply.
I have a 1972 TR6 with a 0.70 bore MC. The original Girling unit had a 80mm push rod, the TRW unit that I replaced it with
has a 74mm push rod. After fitting the TRW unit the clutch did not release. In the end I made an adjustable push rod
and all is now working as it should.
Regards
John
-
Hi iani,
there is some debate as to whether copper plug leads should be used with these electronic ignitions.
I changed to copper in 2017 and have had 2 electronic units fail, may be coincidence, but have gone back to points
and kept the copper leads. Worth checking before you damage your other ignition system.
Regards
John
-
Hi iani,
I had a similar problem to you and found that the Pertronix system had failed even though appeared to test ok.
In the end I re fitted the old points system and it has run fine ever since. Give it a go if you can.
If you search for one of my posts "electronic ignition" you can read the whole sorry tale.
Good Luck
John
-
Thanks for the offer Z320, I've ordered some bits off Ebay to make one.
Will keep you posted.
Also thanks to collin3511 for your input.
John W
-
Hi Roger, if you follow your link you will see that there are in fact two item 37 !!!.
One is as you say, the other is LH and adjustable by the look of it.
Many thanks for your help.
Just found one on the Revington site but no pictures. ( I like pictures)
John W
-
Thanks Roger, did not realise it was adjustable. Any idea why it says LH drive, could it be a different
length than a RH drive unit.
Thanks
John W
-
Can you buy or has any one made a clutch MC push rod ?
John W
-
On 9/24/2018 at 1:26 PM, DaveN said:
I wonder if there is another issue dragging it down? I have the pertronix unit and I’ve just been out to start the car for a spin and thought I’d stick a voltmeter on the battery. The cars not been out for a couple of weeks but it was reading 11.6 volts. Cranking over a bit slowly but it still fired up after a few turns. This is still the original Mr Lucas starter motor.
I think you may be right DaveN and I will have a better look over the winter. I'm pretty sure it's not an earth problem.
Certainly your voltage is much better than mine but it sounds as though your starter is cranking slower than mine.
First stop will be the starter which is the re conditioned original, all be it 30 years ago but not many miles.
At the moment it runs fine on points so will wait for the weather to turn. Went out in it today and ran like a train.
Many thanks for your input
John


Under-wing splash gaurds.
in TR6 Forum
Posted
Hi, because mine are attached to the inner wheel arch they are above the outer wheel arch rim so no chance of being hit by the wheel. The outer edge of my liner has roughly a 5mm gap between it and the outer wing. It depends on how much of a seal you want really. My main concern was protecting the top of the wing, behind the headlight and behind the rear lights. The rest can be cleaned with a hose pipe every so often if you want.
John