


Ukmax
-
Content Count
53 -
Joined
-
Last visited
Content Type
Profiles
Forums
Calendar
Posts posted by Ukmax
-
-
Thank you for the link Stuart.
Keith, I have just read through the whole "hooks" thread and how things have changed since then! I've even mislaid the hooks I made.
As you will see from my later posts, this car turned into a nightmare and has been a very low priority on-an-off job over the last few years.
However it's running well, and in a straight line now, apart from a few small jobs the serious work is complete.
David
-
Hello Keith,
Thanks for putting my mind at rest!
I was convinced I had asked this question before so I searched "surrey AND hooks", which revealed over 140 pages some of which I ploughed through and found nothing on the subject. So I checked my profile and found nothing there but the earliest post listed is March 2019.
Anyway Ive found it now and of course, I have found your pictures.
Thanks again
David
-
Hello,
Please could someone indicate with pictures if possible, exactly where the hooks (part number 611895) for retaining the canopy are located one the windscreen and rear screen pillars.
Thank you
David
-
Hello Pete,
I'm sorry for not replying sooner , I completely forgot to finish my reply and then I wasn't on the forum for a while.
As I said the "bodge" was perpetrated because the front suspension was all over the place, once I corrected the suspension the body could be remounted as per factory; however, I'd like to think it was better than factory! In fact there were the same thick pads more-or-less everywhere, even the thick aluminium slot washers had been replaced with 18mm MDF ones.
The door gaps were okay insofar as the doors opened and closed okay. I have to say I am not overly fussy about the accuracy of the door gaps because it is a car to use for classic regulatory rallying so I'm not really interested in producing a concourse example.
David
-
Many thanks gents for most helpful replies (as usual).
Pete, I think your are absolutely correct about the reason for the 18mm spacers and of course, the use of MDF is insane! This whole job started because the left front wheel was too close to the arch which turned out to be caused by badly damaged front suspension parts on both sides, including the turrets, albeit worse on the left.
Andy, you are correct. As soon as I saw the MDF, I did indeed check for and find, several other bodges all of which have been rectified.
David
-
Hello again,
I’m about to put the body back on my TR4 after remedying the numerous serious errors by the PO who had restored this car to a very low standard!
The parts book lists 4 metal plates, one on each of the body mounting outriggers but there were no such plates fitted when I removed the body, the PO had actually used blocks of 18mm MDF. Are these plates simply shims of some sort to fit as required or should they be present at all times? Also how thick are these plates?,
David
-
MKTR,
Thank you once again.
The picture you posted and those on the links have answered my question.
David
-
I used "Cobra",("Raptor" is another brand) which is a two-pack finish for pickup/ truck beds. Spray on with Schutz gun (good quality one with air control for best results) looks good, sets rock hard, doesn't chip. My son has used it in his business on dozens of Land Rover chassis without any problems.
David
-
Thank you for your trouble. I had looked at that post but it is for a TR4A and the routing around the suspension turrets is different to the TR4 (as are the turrets for that matter)
However, what I did notice on the "Triumph Experience" link is that there is an surprisingly long run of tube around the turret that has no support other than terminations at either end.
David
-
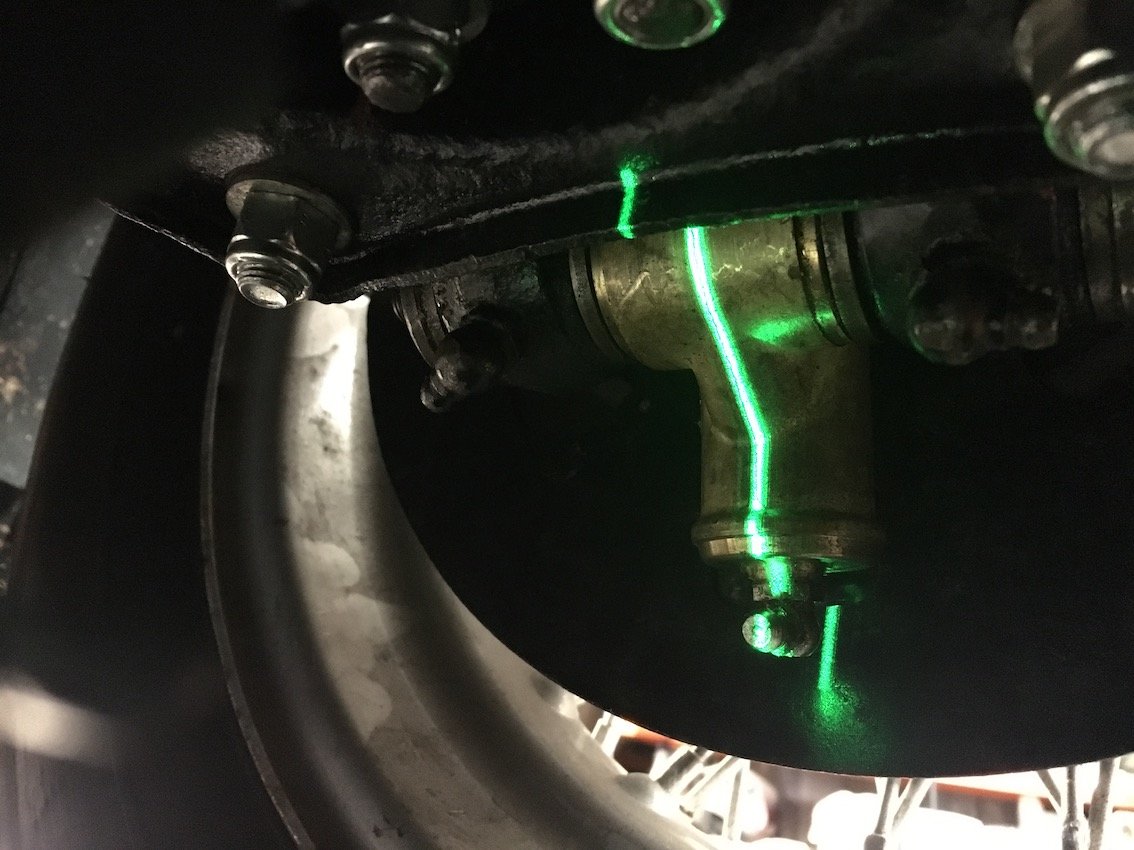
Hello,
Does anybody have a photo of the routing of the front brake pipes from the chassis mounted 4 way connector please.
PO replaced brake pipes but has made a complete mess which just looks wrong.
Many thanks
David
-
Thanks for the reply.
You are correct with regard to the difficulty of calculating the actual weight on only the front suspension (except that the diff doesn't add to it) but I've now given the matter some further thought.
It's really down to the loaded position of the front suspension so it may better to load weight to give the correct ride height at the front chassis crossmember and I seem to recall that this height is given somewhere in the workshop manual - when I find it!
-
Hello again
After nearly three years, I'm bumping my original post for convenience and continuity.
I fiddled around for a another month or so before deciding the only way forward was to strip the whole car down to a bare chassis which I did and thus opened the can of worms!
Bent chassis and bent suspension components both sides, compounded further by an appalling repair attempt resulting in the left side lower arm pivots being welded on about 8mm out of alignment.
I cut the whole lot off and had all new chassis welded parts made by CTM (Colin was extremely helpful). I also obtained new vertical links, trunnions, springs etc from various suppliers.
I made a jig to published chassis dimensions specification, straightened the chassis, tack welded the new parts on and rebuilt the front suspension/steering on both sides to produce a rolling chassis for testing - and then in Spring 2019, it stopped - until now!
I now need to measure the steering and suspension geometry and need to load the chassis to the correct weight can anyone tell me what weight I should use. I have 15 tractor 45Kg weights and about 200 Kg of weightlifting weights of assorted sizes. I propose placing the weights on the chassis roughly on the centre of where the engine normally sits.
Many thanks
David
-
As suggested by Mick, I measured the rear axle for squareness in the chassis and found it be square within a mm.
Close examination revealed a straigthening repair to chassis, roughly between the point where the left side forward body support tube joins the chassis and the first bend, where the chassis starts to taper towards the front. Also the fact there are ground down welds each end of the front crossmember, indicates this has been replaced (or cut out and reattached) at some time. Because of the damage repair, I followed the procedure in the blue manual to ascertain the squareness of the chassis and found it to be within acceptable limits
I checked the wishbone pin mounts for damage as suggested by Stuart and there was no obvious damage but on the left side there is considerable deviation from the measurements given on the chassis dimensions diagram. The deviation from the recommended 273.6 mm (pin centre to chassis centreline) is as follows:-
Left front +11.4mm - Right front +1.4mm
Left rear -11.2mm - Right rear -1mm
It is more than likely that as part of the chassis repair, the wishbone pin mountings have been replaced out of alignment, which accounts for the position of the wheel in the wheel arch. I will attend to this when I strip the suspension next week to replace the spring, shocker and bushes.
Thanks again to all whom assisted with these problems, ironically caused by errors made during previous repairs. I wonder what the next problem will be?
David
-
Gents, thank you very much for the advice, which is much appreciated.
Mick, I did check the rear axle, early on in my investigation and is was square with the chassis. However I don't know if it is in the right place do you have a measurement from an easily identifiable datum please?
I'll certainly carefully examine the areas you suggest Stuart but if nothing is obvious, I may decide to take the body off this car and jig the chassis up properly for my own peace of mind if nothing else.
I'm further frustrated by the problem with my ramp because it's holding me up from cracking on getting this car ready for a forthcoming rally.
David
-
As my initial problem was that the wheel was too close to the top of the arch, I only did a quick cursory check of each side wheel centre to centre measurement by "guesstimating" the centre of the spinners and I recall that it was more-or-less the same each side, but but given I am now only talking about 10mm or so, then "more-or-less" is obviously not good enough! I will therefore accurately mark the exact centres of each wheel and carry out that measurement again.
Before I do this, I will need to set the track on the front wheels again.
David
-
The car has been stuck up in the air for a couple of weeks following a hydraulic ram fault on my ramp and because I store another car under the ramp, I dare not let it down in case I can't get it back up again! (it's supported by acrow props just in case!)
As I said in a previous post, the ride height now appears to be correct but the left side wheel is further back in the wheel arch than the right side wheel and only a couple of millimetres clear of the wing on right lock.
However, I have been able to carry out more measurements because and It's clear that the chassis front or the suspension is still not correct.
Using plumb lines and laser, I have measured the relative positions of the lower trunnions and find that the centre of the right hand trunnion is about 10-12 mm further forward than the left hand trunnion. The line runs on the chassis cross member as near as damn it equally from the edge along the full length so that is square. I also noted that the left side centre line is well off the centre line of the wheel when viewed from wheel side. I can't easily measure the castor angle at the moment.
I cannot accurately do all the chassis measurements I need until I get the car down and am able to strip both sides of the front suspension again.
In the meantime, does anyone know of anything else that would /may cause this discrepancy? Bearing in mind that the first problem was caused by the lower wishbones being refitted upside down by the PO.
David


-
Ken,
I seem to recall that the the remains of a car I referred to was in a neutral gelcoat finish but I can't swear to that.
I may also be incorrect about only having Dorretti part chassis, there may well have been some complete chassis in the original acquisition from Swallow which were sold before I started there.
during the early/mid 60's Monkspath had completely finished with the "specials" market but as I said, they did continue to supply Dorretti parts right up until I left and also stocked some Triumph TR parts. They also continued to repair glass fibre cars and supplied to the public, various weights of glass fibre cloth, resin and body filler powder, i.e., slate dust, which one mixed with resin and was tough to rub down once fully cured!
John Churchley had moved into more mainstream motor dealing, securing dealerships for Skoda (yes, the "'OMG" originals!), Saab, NSU (also before the acquisition by VW) and Daf, in around 1967, they became one of the first UK Toyota dealers.
The old garage was eventually demolished and became a David Prophet BMW dealership, the site is now (ironically) a major Toyota Dealership. In fact, the surrounding area has become sort of "motor city" with all main manufacturer's dealers locating there.
Perhaps there should be a blue plaque erected there saying "Swallow Dorretti reborn here". I'm joking of course but I thinkJohn Churchley did make a massive contribution to the continuance of the marque.
Ahh, fond memories!
David
-
I know I'm bumping an old topic but I've only recently joined the forum and spotted this post following a search for "Monkspath garage" to see if it was mentioned.
I worked at Monkspath garage in the 1960s and of course knew John Churchley (who bore a remarkable resemblance to Graham Hill and probably "moulded" his hair and fine moustache to enhance the resemblance!)
I served quite a few Dorretti owners with parts, although the number of callers was diminishing as the decade closed. There were quite a few engine, brake and suspension parts in the stores but I was told that just prior to my joining "someone" purchased a very large quantity of parts, including the "remaining"' chassis parts. (NB I'm sure the terms "parts" was used when referring to Dorrretti chassis , which would imply that they may not have been complete chassis
I was also told that, although it was considered, the garage never built a Dorretti car but did experiment with a glass fibre body on a Dorertti chassis and I think the remains of this car were in the yard behind the garage along with some old glass fibre body sections and (I think) moulds from earlier "Shirley" cars. I did at one time own a "Shirley" which is what first introduced me to Monkspath garage, which was only a couple of miles from my home.
I was also told that it was though that the "someone" (mentioned earlier) did in fact build a Dorretti using the parts purchased but used a TR3 engine.
David
-
-
Good point Roger, I am familiar with the procedure of drilling a hole to prevent propagation of a crack and it works very well, especially in thin material, especially aluminium but I think when you cut the crack like this one with a disc, the end of the crack is where you decide to cut to but I did mean to say extend the cut and the weld 5mm or so past the end of the crack.
Further study of the photo seems to reveal that the crack wanders a little at the end, in that case I would drill a larger hole to take out "wandering" and crater fill that before completing the weld.
David
-
Cut through (follow) the crack with a 1mm cutting disc to remove any rust or paint etc. that may be lurking, before creating a shallow "V" . Be sure to make a smooth continuous weld of equal width, extending approximately 3 mm each side of crack and with a bead height of around 2.5 mm. I would TIG weld such a crack but if you use MIG be sure to get good equal penetration along length and extend the weld 5mm or so past the crack end.
David
-
Kevin, you raise an interesting point when you say
10 hours ago, boxofbits said:For instance, some buy an old Mini or MGB and just go out and buy a new bodyshell from Heritage. Is that a restoration?
I don't believe such a rebuild is a restoration and unless the bodyshell is an original factory one, it could well be argued that the resulting vehicle is in fact a replica, especially in the case of the examples you give where there is no chassis and the original body carried the original VIN.
I have come across so-called 1960s E type Jaguars for sale, listed as having new (aftermarket) tub, bonnet, doors, rear wings, boot floor and lid and subframe etc etc, with an asking price of north of £250K! In fact, the only original 'period' parts are the engine, gearbox and interior (most of which is probably also aftermarket manufacture)
My way of thinking is, if you take a drivetrain, suspension brakes and electrics from a what becomes a 'donor' car and build them into a body made by another person or organisation then the result is effectively a "special" and if it's designed to have the same appearance as the original donor vehicle, then it's a replica."
An exception may arise when the vehicle (like a TR) has a separate chassis but if you populate an aftermarket chassis with original (say 1964) parts and then mate this with an aftermarket tub and body parts, is that really still a 1964 car? Where does one draw the line?
I would be most interested to hear other opinions but don't really want to hijack this thread, should I start a new thread?
David
-
The Pirelli Cinturatos were certainly very much all the rage in the 60's probably more by virtue of astute marketing than actual performance, but having said that, I had them on a couple of glass fibre "specials" (one TR3 based and one E93a Ford Popular based) and they performed remarkably well in wet and dry. However, I seem to recall that there was some doubt about their performance on heavier cars.
David
-
Thank you both.
It seems that it is best to treat the manual as a guide to procedures rather than a "bible" because drawing E627 (which is marked on the other side as as being TR4A) is clearly not correct, unless only SOME TR4As had the fulcrum this way around.
Andrew, I should have noted your footer "40 years of TR ownership and still learning!" !!!
I've only had mine a few months.
David

hooks for surrey top
in TR4/4A Forum
Posted
Thanks Stuart, but I'm in the process of making new ones in SS.
David