


Lebro
-
Content Count
12,011 -
Joined
-
Last visited
Content Type
Profiles
Forums
Calendar
Posts posted by Lebro
-
-
I fitted a servo when my '3 had drum brakes. that combined with extra hard linings made for very good brakes.
I have now converted to disc's, with no servo, & feel they are perfectly good for road work.
Bob.
-
And the clutch ????????

Bob.
-
Everything you have said, & the pictures confirm that this is a late TR2. Wheels are wider than standard, dashboard not quite right, but these are trivial things, & may even be desirable to you. Without seeing a lot more photos - particularly underneath, chassis etc it is hard to evaluate, but from what I can see it would be worth the 20k you speak of.
Bob.
-
These are pre-engage starters, & have their own solenoid. this not only pre-engages the bendix, but also connects the motor to 12V.
2 Choices - use existing solenoid as is, but add a link wire from main terminal on the starter to the smaller push on one.
or, move the main battery cable from one terminal of your old solenoid to the other, so it is connected to the main starter cable, then remove, & extend the small wire on the old solenoid, & connect it now to the push on terminal on the new starter. ( & don't fit the link wire above.)
Bob.
-
Ian.
Changing from 1152TPM (turns per mile) to 1184TPM would result in a change of 2.8% , so in theory would now read only 6.2% fast.
However these speedo's are crude devices, & it is quite likely that simply changing to another 1152TPM unit would give a different reading.
Providing you have a standard (TR) gearbox, 3.7:1 axle ratio, & normal size wheels & tyres, then the 1184 one would be correct.
Bob
-
-
When sold off by the factory VHP gained the then current Dzus screens, now removable, which are a right pain in the proverbial. I now understand why as the peg fasteners indicated in the TRF diagram on the 3/4 panel and the front one on the door are too high and stop the sidescreen fitting properly........now what to do, move the holes or revert to the original style sidescreens?
Iain
My early '3 has wedge fittings, but the side screens are the dzus type, solid lower section, but with wedges attached. As such when in position they cover the pegs on the door, & the first one on the body, which forces the lower part outwards & was difficult to fit. I lived with this for a while, then came up with a solution which did not require ant hole filling / drilling / painting etc.
I removed the offending LTD pegs, & replaced them with much shallower press studs, & changed the corresponding fittings on the tonneau.
Now the side screen fits happily over the studs.
Bob.
-
I doubt if you have damaged it, unless the TPI was different (threads per inch) but it would not seal well.
parallel holes would normally take a plug with a flange & a sealing washer under that flange.
A Tapered hole would need a tapered plug which would not have any flange, but would need either PTFE tape wrapped around the thread, or some other form of sealant.
Bob
-
I fitted a larger eylet (furrule) so that it fits over the hex base of the LTD peg.
But, My previous tonneau (in the '70s) did not have the split, & was a lot less trouble !
Bob.
-
The good thing about adjustable spanners, is that when you reach for it when under the car, you know it will be the right size

Bob

-
Hi Greme.
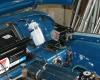
1) You probably need to source a tonneau before you firm up on the hole positions. I say this because on my re-build the
same holes were present, so I assumed they would be in the right place. I eventualy came to fit the tonneau, which was
new, & came with a kit of fixings which you had to fit to the tonneau yourself. All went OK till the last one nearest the door,
even with the lift the dot fastener as close to the edge as it would go it was (still is) a real stretch getting it on the stud.
With Hindsight that stud would have been better ½" higher. See Photo below
2) The bolt on plates were deleted at a certain build No., so it is correct for your car. You will have to do some metal work
I'm afraid.
3) There should only be the 2 X ¼" captive nuts, no central hole.
-
& now fitted (see above)
Bob
-
I would suggest that it is more likely that the gauge & sender are not correctly calibrated. This done by moving by small amounts the coils inside the gauge (if it is the older type where the gauge instantly jumps up to it reading when ign is turned on) If it is the later type then I would check the voltage stabaliser ( does the temperature gauge read correctly? 'cos it also uses the stabiliser)
The idea that the float does not reach the base of the tank could only happen if the wrong sender is fitted, or if someone has fiddled with the end stops on the sender. Why not peer into the tank filler with a torch (not a match !!) and using a piece of stiff wire push the float down to see how far it can go.
Bob.
-
Rich.
Gear Knob received, thanks, & now modified to fit my Hillman:
Bob.
-
It sounds to me that your bonnet is too close to the bulkhead, & needs to slide forward a bit. this would mean the dzus fasteners on the inner wings would also need to move forward. This assumes you have got room to do this before hitting the front apron.
Bob.
-
-
Got my bottle + SS carrier from an ebay site, Probably as close as you will get these days.
Bob.
-
Austin,
I would fit the hinges (with gaskets) first to get the best panel fit. then when all tight, adjust the position of the dzus fasteners on the inner wing to line up precisely with the fasteners in the bonnet. this is most easily acheaved with the bonnet fasteners out, then you can sight through the holes to see if the wire is central. You probably can't remove the bonnet fasteners, so it would have to trial & error !
Bob.
-
Later TR3A's had a rheostat fitted in place of the panel light switch. It is bigger, & thus it's position on the dash was swapped for the wiper switch.
So if your panel light switch (knob) is at the top then it is a switch (pull for on), if it is 1 down from the top then it is a rheostat (twist to change brightness). Either way it has 12V going into it, & if off no volts out, or if on either 12V out, or some lower volts out.
Bob.
-
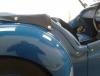
To my (old) eyes it is the hood it's self which is folded over the frame, & then goes down behind the seats.
Bob.
-
My guess is that although you might have good balance at idle, when the throttle linkage operates one butterfly is opening before the other. It's a fiddle to get them both synchronised in opening as there's a clearance between the operating fingers and the throttle plate levers. It needs to be identical. I tried using feelers but ended up doing it by eye.
+1 It's a fiddly job to get them right. Use carbalancer (or a length of hose, & listen to the hiss volume) to get them balanced & at the desired idle RPM. while keeping the linkage clear of the butterfly forks, by adjusting the idle speed screws. Then bring the throttle linkage levers to be close, but not quite touching the butterfly spindle forks, finally open the throttle while watching the spindle forks, & make sure they start moving together.
Bob.
-
Thank you for the info Roger.
Surely if you add a shim under the bearing retainer snout thing it will make the release bearing run at an angle to the input shaft, rather than concentric with it.
The snout has a register in it to retain the bearing and that should be flat/square/perpendicular/concentric to the surface that the release bearing carrier runs on. So is it a problem with the bolt circle concentricilty in relation to that bearing rebate? If it was horribly off the front seal would be on the cock/loaded to one side and potentially leaking.
Confused of Pinner.
Peter W
My thoughts exactly.
Bob.
-
They are certainly all fed from the panel light switch, but the usual reason for dash lamps not working is the bulb holders not make ing good contact with the bulb, or not being grounded properly. All quite hard to get to without pulling the dash partly out.
Bob.
-
I made my own lock stops, as the standard ones were not big / offset enough.
Bob.


Help with buying a TR2
in TR2/3/3A/3B Forum
Posted
Chassis were the same , but a clue might be the i.D. plate welded to the top of the front cross member (under the crank pulley) it is a short number beginning with "Z". Table below should help.
Z PLAQUES.doc
Bob.