


mikeh
-
Content Count
63 -
Joined
-
Last visited
Content Type
Profiles
Forums
Calendar
Posts posted by mikeh
-
-
Hi Eddie,
Have a look at this thread from Pistonheads - about 3/4 of the way down on page 1.
https://www.pistonheads.com/gassing/topic.asp?h=0&f=47&t=2023189&i=0
Regards
Mike
-
Hi David,
This might be a lot easier than it appears! See my PM
Regards
Mike
-
Hi David,
You might be able to reconfigure your lock barrels to suit keys you already have. This article explains how to go about it:
http://www.team.net/www/rootes/sunbeam/alpine/mk1-5/techtips/keys.html
Regards
Mike
-
On 4/22/2023 at 9:25 AM, RobH said:
That sounds like a modern AVX section cogged belt Tim (-or it might be an industrial BX which are available in a wider range -), so is not the original type and you won't get it from Moss or Rimmers etc. I use one of those as it is more flexible than the original stiff wide belt and far easier to fit. They are available in a multitude of lengths so you really need the numbers to get the right one for you. I use a 965mm inside length one (BX-17-965) but I have a home-made alternator set-up so yours might need something slightly different. If you really can't read the numbers, measure the belt but beware that AVX belts are numbered for outside length while BX ones are for inside length.
They are available from most bearing suppliers, e.g.:
or
https://www.totallybelts.com/collections/avx17-v-belts/section_avx17-17-5mm-wide
I've taken the same approach as Rob and am running a BX35 cogged belt with a standard dynamo set-up & original pulleys on my TR4. It's far easier to fit than the 'old style' belt, runs well & is widely available. Dimensions are 959mm outside and 889mm inside (or 37.75" & 35" respectively).
Regards
Mike
-
Hi Richard,
If you've got a multimeter and feel confident to have a go, there's a fault-finding guide on page 32 onwards of the manual which this link takes you too (it'll download a PDF file). If not, is there someone local to you who might give you a hand? If you can identify the faulty part that would be a good start.
https://www.google.co.uk/url?sa=t&rct=j&q=&esrc=s&source=web&cd=&ved=2ahUKEwjd_aaMkYn8AhVaQkEAHWM2BwUQFnoECDUQAQ&url=https%3A%2F%2Fwww.acwilgar.co.uk%2Fboiler-manual-pdf%2Fpotterton%2Fpotterton_kingfisher_mf%20cfl%2040-100_install%207.pdf&usg=AOvVaw1Kg1sZx8sqe-qr6dbJg2ugIf it is the fan or something relatively simple to change, you may be able to get hold of one, either from a supplier or from eBay, if you go & collect it.
Good luck
Regards
Mike
-
Hi,
Burlen (see my reply to your other post) don't appear to sell these but it's worth a call to them anyway as I doubt the parts are unique to the CD175 and are likely to be common to most/all Strombergs of that era. If they can tell you which carbs to look for then your best bet is probably to look around (eBay, autojumbles, this & other relevant forums, etc) for a suitable unit from which to salvage the bits. The parts in question don't incur significant wear in use so the condition of the rest of the carb is largely immaterial as long as it has what you need.
Regards
Mike
-
Hi,
Burlen can supply the o-ring in question as well as other parts:
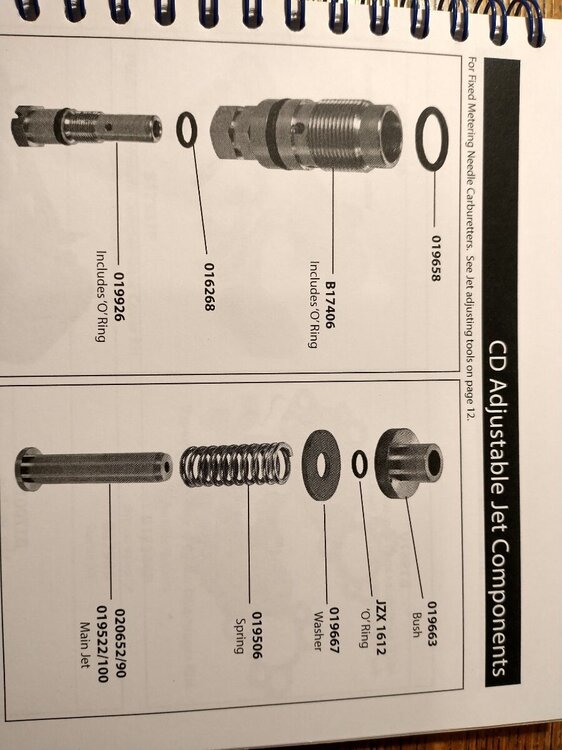
https://burlen.co.uk/?___store=defaultI found them to be very helpful when I rebuilt the Strombergs on my own TR4. If they still do the reference catalogue (photo attached) then it's worth getting hold of a copy and I've also attached a photo of the relevant page from it.
Hope this helps
Regards
Mike
-
Thank you to everyone for their advice and suggestions. The good news is that the car passed its retest this morning with the tester saying that the brakes were excellent for an old 'un - not sure whether he meant the car or the owner though?!
In the end, I stripped the mechanical parts of the brake assembly completely, cleaned everything and then reassembled, being careful to thoroughly grease the sliding surfaces. I didn't actually find anything of significance although, for good measure & comparison, I stripped the nearside too. The only point I did note was that the rubber seal around the cylinder fixing clips & handbrake lever was dry on the underside where it sits on the backplate. When the cylinder moves, this also needs to slide so I made sure that it was well-greased. Finally, to the point a couple of people raised about the handbrake lever creating a groove - it's clear where the lever pivots but I'd describe it as a slight indentation rather than a groove so, fortunately, it doesn't impede the operation and isn't at the stage of needing to be welded.
So, a good outcome in the end and I've certainly got a lot quicker at removing/refitting the brake shoes and the cylinder fixing clips.
Thanks again
Mike
-
Hi all,
My TR4 failed its MOT yesterday for imbalance of the rear brakes – both the footbrake and handbrake were operating with reduced efficiency on the offside. Interestingly, this was certainly not noticeable in normal driving even once I knew it was there & was checking for it.
Having now taken a look, the cylinder in question is as dry as a bone, the piston moves freely and the brake shoes/drum are free from contamination. The only issue I could find was that the cylinder seemed somewhat reluctant to slide in its slot. I’ve therefore dismantled everything and have cleaned/regreased the contact areas so that it now slides more easily.
The fact that both the footbrake and the handbrake were below par would seem to point to the issue being mechanical rather than hydraulic, but I’d appreciate any other comments/advice forum users may have on the problem, including how I might check things before I take the car back for a re-test.
Thanks
Mike
-
Hi,
You have a PM
Regards
Mike
-
Hi Pete,
Have sent you a PM
Thanks
Mike
-
2 hours ago, Willie said:
YES! I used the wife's tape measure and it is at least 60" to the bulkhead, so actual length is greater. The debate is now.....48" standard or 51" as recommended by Revingtons. Should the cable be fed straight from the bulkhead under the master cylinders? I am hoping for opinions on that too!!
Best wishes Willie
Hi Willie,
As mentioned, I recently bought GSD 111 (48") as a replacement and it fits fine, although I must admit I hadn't spotted that Revington actually list GSD 113 (51") as their recommendation. The 48" version doesn't seem tight in any respect so the extra 3" is probably neither here nor there really and either cable will be a big improvement on what you've got at the moment.
The route, at least as my installation, is between the rear of the rocker cover and the battery, with a supporting p-clip on the driver's side battery clamp, and then down between the master cylinders to the bulkhead grommet. It should fall fairly naturally to this route as you don't want any tight bends or real tension on it.
Hope this helps
Mike
-
Hi Willie,
The Moss catalogue shows the TR4 RHD tacho cable as 48" in length and this is what I've recently fitted to my own car. The part number is GSD111 and its used on many other cars of the same era so is widely available. You'll find that this will fit much better than your present cable which looks to be quite a lot too long.
Hope this helps
Regards
Mike
-
Hi Don,
I'm sure there will be others too but the firm I've used is E. P. Services - link below:
Hope this helps
Regards
Mike
-
Hi Pascal,
I've previously used multicore solder as a substitute for the lead linger - it works well. You need only a few inches and, if you don't have any in the garage, short lengths aren't expensive on eBay and are readily available.
Hope this helps
Regards
Mike
-
If you have the original two-coil RB106 regulator fitted, an alternative approach is detailed in an article by Dr Hugo Holden:
This involves swapping the A and A1 connections and, as explained in the article, gives significantly improved performance. It can't generate more output from the dynamo of course, but it does give better voltage regulation and reduces under/overcharging across the load range. Apart from swapping the wiring, all that's required is a slight adjustment of the voltage regulation setting, which is easily done. The paper also details the fitment of a diode to protect the voltage regulator contacts - again a very simple, cheap and effective modification.
There's a lot of other TR-related reading on his website and it's well worth a look:
Regards
Mike
-
Just to update this thread ................. I did eventually find someone to supply/fit the required throttle spindle bushes. Most of the usual suspects either wouldn't touch Strombergs or would only do the work as part of a complete overhaul/refurbishment. However, both Southern Carbs (as recommended by Stuart) and G.W.Carbs would fit bushes to a stripped-down body, which is what I wanted. I opted for Glen Watson at G.W.Carbs - despite his web address (www.sucarbs.co.uk) he does deal with other types too. He did an excellent job quickly and at a very reasonable cost. (Usual disclaimers, etc. I'm just a satisfied customer)
For other reasons, it's taken a while to get the car back on the road, but the end result has been very satisfactory. While one would probably never call a 4-pot TR idle 'smooth', it's a lot smoother than before and pulling away from rest is more progressive too, especially when cold. I didn't think the play was really excessive at c5 thou, but was clearly wrong as sorting it out has made a big difference.
If anyone wants any more details then just let me know.
Regards
Mike
-
I’m looking to replace the carpets in my TR4 as they’re somewhat the worse for wear. Having researched previous posts on the subject, the consensus seems to be that the sets from the TR Shop offer both a good fit and good value for money (I’m looking at a standard set rather than wool).
However, they’re currently out of stock and, having been promised some weeks ago that they’d be in by now, I’ve just been told that they’ll be at least a further 4-6 weeks.
Does anyone know, by any chance, who actually manufactures these for the TR Shop or whether their supplier’s carpets are available elsewhere? Based on the good reports on the forum, notably from Stuart, I’m somewhat reluctant to go elsewhere but am open to any helpful suggestions.
Thanks
Mike
-
Hi Bob,
Thanks for the very kind offer - much appreciated. I think I'm ok at the moment but, if I have a problem when I've been able to get a better look at the faulty one currently fitted and compared it with my spare, then I'll get back to you if that's ok. I may be missing something (ref John's post above) but there doesn't seem to be anything obviously handed about the spare (there's no part number on it) but, without a closer look at the door internals, it's difficult to be certain.
Regards
Mike
-
Hi,
Is anyone able to tell me whether the door remote control assembly is handed? There are two numbers in the parts book (750171 & 750172) but, on the face of it, it looks as though it should work on either side.
Any help appreciated.
Thanks
Mike
-
Hi Steve,
You have a PM
Regards
Mike
-
Hi Steve,
I'm in the process of refurbishing the seats for my 4 at the moment and decided to cut my own foam rather than pay the eye-watering prices you mention. A square of 2" thick material large enough to do the base or back of one seat cost me £6 and a large sheet of 1/2" for the edge, etc (large enough for both seats) was another £10, so I paid £34 for the foam to do both seats. It's very straightforward to cut and shape the blocks with an old bread knife and, by sticking sections together, it's easy to build up the required shape.
I'm fortunate to have a foam shop nearby but there are others around and on the internet too. Incidentally, Dunelm also sell a good selection of the thicker foams although they don't appear to do the 1/2" sheet.
I suspect that the foam for the 6 seats is a bit more complicated than the 4 (I have the fairly simple 'Type 3' seats) but, nevertheless & based on my experience, you should be able to sort it yourself at a fraction of the cost.
Hope this helps
Regards
Mike
-
Hi Berry,
Yes, it's definitely not a job for which I have either the kit or the skills, but there are quite a few carb rebuilders around. The challenge has been finding one who will a) deal with Strombergs (a number of them won't) and b) will do the re-bushing on its own without it being part of a full rebuild.
I've now got a couple of promising leads so hopefully will get it sorted.
Regards
Mike
-
11 hours ago, stuart said:
You could ask these guys for guidance http://www.southerncarbs.co.uk/page_1830645.html
Stuart.
Hi Stuart,
Thanks for this - I'll give them a call. I've also found another place which might do the work so hopefully I'll get something sorted.
Regards
Mike


Healey 4000
in Social Scene
Posted
I can definitely second Waldi's recommendation of the Healey museum near Utrecht - well worth a visit. Referring to Hamish's original post, here are a couple of photos of the Healey 4000 prototype which is in that collection.
Mike
PS If you look carefully at the overhead photo, you can see where the hood cover has had a piece let in to fit the wider body and, when you see the car 'in the flesh', many of the other changes are evident.