EliTR6 Posted August 20, 2017 Report Share Posted August 20, 2017 Hi all, I've finally found a way back into the TR fold. It's an ex-US shell on a chassis that was reconditioned about 10 years ago and the engine and gearbox from my old TR6 (CP PI) which was last running a decade ago. I'm trying to figure out where to start. I'm thinking get the clutch mechanism working then move onto the brakes (needs new brake lines) before looking at the wiring harness (not sure whether to replace or not). Will convert the rear to coil overs. I'm not competent enough to judge the condition of the hubs, driveshafts and diff but I think there are other priorities right now. I'll be fitting polybushes later on too. Phoenix big bore exhaust, and hopefully a second hand black interior, dashboard and bucket seats to give it some character. And the rear panel needs to be satin black. Here are some photos: Here are my other two time and money pits, the blue one also sports a straight six. Quote Link to post Share on other sites
Alec Pringle Posted August 20, 2017 Report Share Posted August 20, 2017 Great to see you back !! Looking forward to more from you . . . . . Cheers Alec Quote Link to post Share on other sites
openroad Posted August 20, 2017 Report Share Posted August 20, 2017 Half the work done, and looking good, so only another half to go !! Whatever happens, just enjoy it, Cheers, Conrad. Quote Link to post Share on other sites
Guest ntc Posted August 20, 2017 Report Share Posted August 20, 2017 The young mans back nice looking 6 that Quote Link to post Share on other sites
Chris59 Posted August 20, 2017 Report Share Posted August 20, 2017 E, I'll be in St Omer the 5th, 6th or 7th of September Quote Link to post Share on other sites
trt74 Posted August 21, 2017 Report Share Posted August 21, 2017 Hi Eli, Good to see you back! Will you be fitting the roll cage you've bought from me back then? Cheers, Tim Quote Link to post Share on other sites
elclem1 Posted August 22, 2017 Report Share Posted August 22, 2017 Hi Eli you know where I am if you need any help Quote Link to post Share on other sites
TR 2100 Posted August 22, 2017 Report Share Posted August 22, 2017 (edited) That's a very very tidy car. Based on what part-restorations usually go for, you should have yourself a bargain. AlanR Edited August 30, 2017 by TR 2100 Quote Link to post Share on other sites
EliTR6 Posted August 30, 2017 Author Report Share Posted August 30, 2017 (edited) Hi everyone, thanks for the encouragement. I haven't had a chance to work on the 6 yet, it's looking like more of a winter project. There's a CJ Autos tilting lift on it's way and I'm drawing up an initial parts list. I hope Santa gets it New brake system and a new loom to start. I'm a on a tight budget, really stretched myself buying the old girl but it will be worth it in the end! The weak pound makes the pill a little easier to swallow. Tim, the rollcage was fitted to a hillclimb TR5 in France. I hope to find another one when the time is right! Best, Eli Edited August 30, 2017 by EliTR6 Quote Link to post Share on other sites
roy53 Posted August 30, 2017 Report Share Posted August 30, 2017 save some money , avoid the coil overs. Quote Link to post Share on other sites
EliTR6 Posted September 11, 2017 Author Report Share Posted September 11, 2017 (edited) The new lift has arrived! I'll buy a tranny jack to fit under the diff as a precaution Still haven't had time to do anything on the car apart from a walk around with my old friend Chris59 I'll get cracking in October. First jobs will be to fit a new loom and brake lines Edited September 11, 2017 by EliTR6 Quote Link to post Share on other sites
EliTR6 Posted September 29, 2017 Author Report Share Posted September 29, 2017 (edited) First free weekend since the car arrived. I'm looking forward to getting stuck in tomorrow. And the first new bits have arrived too (amazingly fast delivery from the TR Shop btw) Edited September 29, 2017 by EliTR6 Quote Link to post Share on other sites
marki Posted September 29, 2017 Report Share Posted September 29, 2017 Hi EFI. Change of subject, how are you finding the lift ? Cheers Mark. Quote Link to post Share on other sites
EliTR6 Posted September 29, 2017 Author Report Share Posted September 29, 2017 Hi EFI. Change of subject, how are you finding the lift ? Cheers Mark. It's pretty nifty given the size and cost of it. Good access to everything underneath and it feels very stable. I've got some tall axle stands I'll slip underneath just in case. I haven't had the opportunity to use it but it should prove it's worth once I get around to jobs like removing the diff. Quote Link to post Share on other sites
Chris59 Posted September 30, 2017 Report Share Posted September 30, 2017 Eli, don't leave it on the lift for nothing, the chassis will not appreciate the "unsprung" weight...... BTW, may be safer to not even try to open a door. Quote Link to post Share on other sites
EliTR6 Posted September 30, 2017 Author Report Share Posted September 30, 2017 (edited) Eli, don't leave it on the lift for nothing, the chassis will not appreciate the "unsprung" weight...... BTW, may be safer to not even try to open a door. Thanks buddy. I only jacked it up for a test and the photos, all good It's looking tidier already with the new loom Edited September 30, 2017 by EliTR6 Quote Link to post Share on other sites
Chris59 Posted October 1, 2017 Report Share Posted October 1, 2017 Well done ma poule ! Quote Link to post Share on other sites
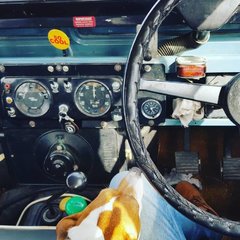
EliTR6 Posted October 7, 2017 Author Report Share Posted October 7, 2017 I've spent a morning with the Haynes manual and online wiring schematics and am pleased with my progress. I feel like I understand the electrical side of it a lot better now. A few questions: I take it the stray wire lurking under the servo is for the brake warning system? Have I wired the fusebox the right way round (alternator input is on firewall side)? I've wired the fusebox to overdrive relay from the fused side (white and brown wires on top row of fusebox), is this right? What's the spare white wire coming out of the main loom (in front of fusebox in photo)? Is it an extra power feed from the alternator to power a leccy fan or similar? I can't find the middle overdrive switch on the 2nd photo in any diagrams and I don't seem to have cables for it in the new harness. What have I missed? Thanks! Quote Link to post Share on other sites
stuart Posted October 7, 2017 Report Share Posted October 7, 2017 (edited) Original UK CR fuse box.Just in shot.The 2nd white is piggy backed with the other. Middle switch is reverse there are only two overdrive switches. Stuart. Edited October 7, 2017 by stuart Quote Link to post Share on other sites
EliTR6 Posted October 7, 2017 Author Report Share Posted October 7, 2017 Thanks Stuart, The first white is a double wire, if I add the extra one I have 3 white wires going into the same fuse as per below Quote Link to post Share on other sites
EliTR6 Posted October 28, 2017 Author Report Share Posted October 28, 2017 Bonjour! I haven't had much free time recently but have managed to straighten out the metal dash, give it a couple of coats of paint and have put 6 coats of varnish on the wooden dash. The veneer is past its best but I figured this will do for now and I can't afford to splash out on a new dash. Next stop, refitting the gauges and then it's onto rebushing the suspension Quote Link to post Share on other sites
Mark69 Posted October 28, 2017 Report Share Posted October 28, 2017 (edited) Well done Eli, good to see you making progress. Another option for you is to re veneer. I'm no joiner/woodworker but had ago at re covering mine. A little time consuming but worth the effort. Mark Edited April 14, 2020 by Mark69 Quote Link to post Share on other sites
EliTR6 Posted October 28, 2017 Author Report Share Posted October 28, 2017 IMG_20170417_153816.jpg Well done Eli, good to see you making progress. Another option for you is to re veneer. I'm no joiner/woodworker but had ago at re covering mine. A little time consuming but worth the effort. Mark Thanks Mark, your dash looks amazing. Plan is to pick up a spare dash and a 2nd set of gauges to restore further down the line. Quote Link to post Share on other sites
Steves_TR6 Posted October 28, 2017 Report Share Posted October 28, 2017 I re-veneered my dash too, use self adhesive teak veneer and oiled it with Danish oil Very pleased with the result, has lasted 3 years and still look great, was worried would need to oil it again but not yet! Steve Quote Link to post Share on other sites
EliTR6 Posted October 29, 2017 Author Report Share Posted October 29, 2017 (edited) Is it ok to support the car on axle stands so it's sitting on the rounded bit of the trailing arms? I'm going to take the diff out and it's a perfect fit for the tall stands. Thanks! Edited October 29, 2017 by EliTR6 Quote Link to post Share on other sites

Recommended Posts
Join the conversation
You can post now and register later. If you have an account, sign in now to post with your account.