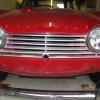
barry p cook Posted April 3, 2015 Report Share Posted April 3, 2015 Hi everyone, The restoration of my TR4a's bodywork has reached the rear valance. Most of the other panels I've fitted have been o.k. with a little bit of work but the rear valance is proving to be a bit of a challenge. The worst part is the fit around the rear lights as hopefully the photograph attached shows. My questions are: 1. Has anyone else had similar issues? 2. What did you do to make it fit? I remember seeing a photo in a thread recently (can't remember which one) where a whole load of lead had been added to the valance around the light cluster and I am wondering if this is the likely remedy. Regards, Barry Quote Link to post Share on other sites
stuart Posted April 3, 2015 Report Share Posted April 3, 2015 Those would have been my pictures then, if you have a repro back panel then you will really struggle to get it to fit as they are very poor. Is the small infill panel in your picture already spotted to the back panel as it is sitting way too low for one and the angle that it curves out towards the light pod is wrong too.. It may be an idea to separate it from the lower back panel and then fit it to the lamp pod and then get the rest to fit. The factory used a lot of lead round that area anyway as the panel fit was poor so that may well have to be the way to go. Stuart. Quote Link to post Share on other sites
ST TR5 Posted April 4, 2015 Report Share Posted April 4, 2015 Hi In my experience of using two repro panels you need to unpick them as Stuart said but the main valance section is still to long for the bottom edge of the boot lid. I have cut the valance in the centre below the boot handle vertically removing 10mm then reweld up to get a nice fit around the corners of the boot lid. Cheers Sean Quote Link to post Share on other sites
barry p cook Posted April 4, 2015 Author Report Share Posted April 4, 2015 Stuart, Sean, Thanks for your comments. Removing the small upright pieces is a good idea. I will follow through with the suggestions and let you know how I get on. Much appreciated, Barry Quote Link to post Share on other sites
Rob Salisbury Posted April 4, 2015 Report Share Posted April 4, 2015 Hi Barry, no consolation I know, but the fit around that region was difficult using a genuine, complete Stanpart rear deck (back in the day you got the whole thing, assembled,including the strengthening panel) and Stanpart rear valance back in 1978 when I rebuilt my 4A, get everything pulled tight around the lamp housings and, with the outer wings in place, check the fit of your lamp units and boot lid (hinges, some sealing rubbers and boot lock in place) before you even think of the paint colour!! Good luck, cheers Rob Quote Link to post Share on other sites
boxofbits Posted April 4, 2015 Report Share Posted April 4, 2015 (edited) When I fitted my 4a rear valance back in the 90's it was a Cox & Buckles part, and was actually too long. I ended up cutting a small piece out of the centre to get it fit. What we call fettling and I don't think things have changed much! Kevin Edited April 4, 2015 by boxofbits Quote Link to post Share on other sites
barry p cook Posted April 4, 2015 Author Report Share Posted April 4, 2015 Thanks Rob, Hoping to find time to do some more work on it later this week. I think I have a few months to think about the colour. My head says stay with the original Signal Red, my heart says dark blue or BRG. Regards, Barry Quote Link to post Share on other sites
Tr4Tony Posted April 4, 2015 Report Share Posted April 4, 2015 Barry My experience us the the lower rear valance itself can be made to fit but it's a lot of work. The segments under the tail lights are just awful so start somewhere else.mTry to get some used original parts - Walter Petchey had a pair at Stoneleigh so try him ... 01376 342 724 I had some valances hand made some years ago - none left but not all used I believe. Worth while tracking one down if you can as they were the correct fit with some minor work. I fitted my own. Regards Tony Quote Link to post Share on other sites
barry p cook Posted April 6, 2015 Author Report Share Posted April 6, 2015 Hi Tony, Having forked out a not inconsiderable amount for the panel there is a certain amount of determination to make the b----- fit. If it defeats me I will try the original panel route. Thanks, Barry Quote Link to post Share on other sites
ronhatch Posted April 6, 2015 Report Share Posted April 6, 2015 As previously mentioned lots of hammer, blowlamp and effin and jeffin required in this area (and all the others) but you will get there, as for the colour, mine was red and I felt i needed to keep it that colour but I always wanted a BRG one so green it will be (remember that conversation Stuart)good luck Regards Ron Quote Link to post Share on other sites
barry p cook Posted April 15, 2015 Author Report Share Posted April 15, 2015 Managed to get some time in the garage today. I decided to do as Stuart and Sean suggested. Splitting the infill panels from the valance was a pain though. There are about 9 spot welds and two small runs of mig. Not easy to split them without damaging both. It would be so much better if they were supplied as three separate parts. With the infill parts removed I managed to clamp them whilst i opened up the angle between the panel and the channel for the boot. It's not there yet but it's a lot better than it was. I am hoping to get more time to finish it off next week. Attached are a couple of photos. Thanks to everyone for their suggestions. Barry Quote Link to post Share on other sites
barry p cook Posted June 16, 2015 Author Report Share Posted June 16, 2015 It's taken longer than planned but it's finally finished. I needed to repair the boot lid aswell and I used one of Roger's repair panels. Thankfully that fitted well but the valance proved to be a pig till the bitter end. I have to confess to a feeling close to elation when I turned the lock and the boot lid pulled down nicely onto the seals. That is hopefully the last major hurdle completed on the rebuilding of the tub. Just a few jobs to complete and I can then move my attentions to building up the rolling chassis. Thanks for everyones suggestions, its been the most difficult panel on the whole car by some margin. Barry Quote Link to post Share on other sites
stuart Posted June 16, 2015 Report Share Posted June 16, 2015 FWIW I would check that the bumper irons will go through the holes in the valance OK now before you go too much further. Stuart. Quote Link to post Share on other sites
barry p cook Posted June 16, 2015 Author Report Share Posted June 16, 2015 Thanks Stuart, Will do. Barry Quote Link to post Share on other sites

Recommended Posts
Join the conversation
You can post now and register later. If you have an account, sign in now to post with your account.