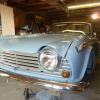
david c Posted October 4, 2014 Report Share Posted October 4, 2014 This can't be right, any suggestions please? I hope the photo works.............if not this post will make no sense at all Quote Link to post Share on other sites
John390 Posted October 4, 2014 Report Share Posted October 4, 2014 (edited) I would suggest that you have a 'pattern' wing. As in not Stanpart! I have seen quite a few like this. Cheers John Edited October 4, 2014 by John390 Quote Link to post Share on other sites
graeme Posted October 4, 2014 Report Share Posted October 4, 2014 David, This looks like a repro rear wing with badly formed upper curve. Try and get an original rear wing or one from the new Bastuck range. Graeme Quote Link to post Share on other sites
david c Posted October 4, 2014 Author Report Share Posted October 4, 2014 I thought it might be something like that, no amount of fiddling about is going to sort this out, but I am tempted to try and reshape the rear wing top.........whats the worst that can happen....................... Quote Link to post Share on other sites
John390 Posted October 4, 2014 Report Share Posted October 4, 2014 I think you will also find that the curvature of the door 'thickness' is also wrong. Look at the car from the rear looking forwards and check the curve. You will probably be better off looking for another wing. Cheers John Quote Link to post Share on other sites
AlanT Posted October 4, 2014 Report Share Posted October 4, 2014 (edited) This is an repaired original wing next to a door re-skinned with a Moss panel. Plus a little bit of fettling. And is not perfect. https://flic.kr/p/jSAz4P Your door maybe too high which is why the waist-line does not match. These panels are in primer I think. I would grind the wing edge to match the door and then seal the edge with MIG. I had to do about 1in of this on one of my doors. It's quite easy. Edited October 4, 2014 by AlanT Quote Link to post Share on other sites
boxofbits Posted October 4, 2014 Report Share Posted October 4, 2014 First you will need to line up the swage lines, and until you have done that you cannot tell where you are with it. If the front wing is in its original or correct position then gap the front edge and check the bottom gap, and check the swage line. You also should get the door to open and shut into the B post lock and the top guide. Then see where you are with the rear wing and only then can you alter the line of the rear wing. Good luck with it Quote Link to post Share on other sites
AlanT Posted October 4, 2014 Report Share Posted October 4, 2014 Agree with all of that. But this is a complex puzzle and there will probably have to be some compromise somewhere. The most critical bits are the locks and the glass fit to the screen frame. The further down you go the less obvious any imperfections seem to be. Fit a door-seal too. You don't want to find it all fits but the door won't shut! Quote Link to post Share on other sites
littlejim Posted October 4, 2014 Report Share Posted October 4, 2014 With the paint on it is hard to know the orignal shape. When I blasted back to bare metal I occasionally found some creative filler/f-glass art revealed. When I finally had the door aligned where I wanted it I used Stuart's lead loading technique to get the gaps as I wanted them. (photobucket is in dummy spit mode at present so no piccies) Quote Link to post Share on other sites
TR 2100 Posted October 4, 2014 Report Share Posted October 4, 2014 My starting point would be to work out whether it's the wing that is a repro or if it is the door with a new skin. Maybe it's both. It should be possible to identify a new door skin by the welding - I think this would be visibly different to the factory welding. I know that on most repro rear wings, especially the early ones, the curve of the wing above the swage line, was too flat - similar to your photo. They can be re-worked but it's time-consuming and you need to know what you are doing. I don't have any knowledge of new door skins but it seems AlanT has experience of these! AlanR Quote Link to post Share on other sites
littlejim Posted October 5, 2014 Report Share Posted October 5, 2014 dummy spit at Photobucket over. Quote Link to post Share on other sites
Geko Posted October 5, 2014 Report Share Posted October 5, 2014 Looks like it's the wing. The sheet looks so thin at the top that it could only be a repro. The door skin curve seems ok as compared to the pic below which portrays another repro wing with the right curve pattern but which is too short by 3 mm on the post. I would also check the chassis strength before you start anything.... Quote Link to post Share on other sites
littlejim Posted October 5, 2014 Report Share Posted October 5, 2014 (edited) I know this is 'rough as guts', angle can distort etc. but the door shape looks odder than the wing shape to me. Dave Geko Edited October 5, 2014 by littlejim Quote Link to post Share on other sites
AlanT Posted October 5, 2014 Report Share Posted October 5, 2014 https://flic.kr/p/pwy3JF Quote Link to post Share on other sites
littlejim Posted October 5, 2014 Report Share Posted October 5, 2014 https://flic.kr/p/pwy3JF see what you mean. The eyes don't have it after all. Quote Link to post Share on other sites
AlanT Posted October 5, 2014 Report Share Posted October 5, 2014 Note that I moved the door down but left its outline alone. You will all just have to trust me because I could have made this photo show ANYTHING! Quote Link to post Share on other sites
stuart Posted October 5, 2014 Report Share Posted October 5, 2014 Jim has the right idea, thats an easy fix with a drop of lead. As long as the door shuts right on the catch and lines OK with the sill and front wing then the rest can be brought into line.I suspect the wing has been repaired before as the leading edge is always very prone to rot. Stuart. Quote Link to post Share on other sites
Steve Zodiac Posted October 5, 2014 Report Share Posted October 5, 2014 Hi, Looks like an 80's repro rear wing to me. Have fitted a number of them. Door seems to be set a little too far in as a start. The 'B' post fixing / reinforcer needs to be taken out of the wing in the first instance (uncrimp the flange and sweat out the braze if there is any present) Then, force some curvature into the top of the wing - roughly the top 120mm between the swage line and the deck fixing flange. You should do this all along the top of the wing. If you look at an original rear wing they have a significant curve at the top whereas the repros are 'flattish'. You can then shape the wing to fit the door and the deck without having to struggle with the 'B' post mounting flange. Next, fit the mounting flange to the 'B' post and make it fit the door and the modified wing. Don't be surprised if you have to cut and weld the top bit off the wing to get the gap right. You may need to add metal to the edge of the wing to get it close. If the door skin is fitted well it should need a minimum of adjustment as they are good quality items and dimensionally correct which is more than can be said for the wings! When you've got it right refit the flange to the wing with a couple of spot welds or some structural sealer which is where the rot will set in if it isn't sealed up properly. Hope this helps Steve Quote Link to post Share on other sites
AlanT Posted October 5, 2014 Report Share Posted October 5, 2014 Looks like we agree that the door is not too bad and the wing needs modification. Its up to you to decide if the wing needs a bit removed or a bit added on. Hard to tell from one photo. Quote Link to post Share on other sites
david c Posted October 5, 2014 Author Report Share Posted October 5, 2014 Staggered as always by the wealth of knowledge and the degree of help you all offer, thank you all. The doors are I am sure good originals, got them from the Flying Englishman, and one of the still had the service / oil change sticker on from San Diego! The off side rear wing however is a very different story, as you have pointed out the top curve is somewhat flatter than that on the doors. I have taken all the paint and a fair bit of filler off to get back to bare metal. No lead or weld added to either door or wing...........yet, but as LittleJim said some imaginative and good quality filler work. In the words of Hercules Poirot when the little grey cells they are busy, then the answers they present themselves! and indeed they do. one at at time, little by little and painfully slowly. I had read in previous post that a full day should be allowed to get the panel gaps right.........right, so that's about a week each side for me then, There seem to be an infinite number of mechanical adjustments and that's before I start welding and hitting things with my assortment of hammers. Thanks again for all your help. Quote Link to post Share on other sites
stuart Posted October 6, 2014 Report Share Posted October 6, 2014 A day for panel adjustment is no where near enough, The gaps should be corrected all the way through the build as you will be building up the whole shell many many times as you go on. Thats the only way to ensure that after youve painted it they all go back in the right place Stuart. Quote Link to post Share on other sites
Tony Millward Posted October 6, 2014 Report Share Posted October 6, 2014 I hope Andrew is reading all this.... Tony Quote Link to post Share on other sites
david c Posted October 6, 2014 Author Report Share Posted October 6, 2014 My goodness Stuart your dead right there, and what gives me hope is that every time I put the panels back on they fit just that little bit better, with the exception that is of the door to wing gaps all of which seem as odd as the posted photo, I have to conclude therefor that, either ALL the wings are repros or the doors are from an earlier / later pressing?..............or something else. As to what to do about it, I should like to try my hand a leading the leading / trailing edges of the wings, but how I go about recreating a matching curve I am not sure, I will probably practice on a few scrap bits and see how it goes. if all goes well increasing the curve should bring up the swage line, just a little. Stuart what did you use as a "former" behind the wing you were leading, I assume something that the lead would not stick to? Thanks again all. Quote Link to post Share on other sites
stuart Posted October 7, 2014 Report Share Posted October 7, 2014 It may be just that the doors have been re-skinned badly, I have come across that a lot as there is a lot of leeway to fit the skin. I use a piece of 20SWG ally sheet as a rest/former when leading out the edge of panels as lead wont stick to it. Dont forget to tin both sides of the panel when extending panel edges. Stuart. Quote Link to post Share on other sites
david c Posted October 7, 2014 Author Report Share Posted October 7, 2014 Thanks Stuart, I'll let you know how I get on. Quote Link to post Share on other sites

Recommended Posts
Join the conversation
You can post now and register later. If you have an account, sign in now to post with your account.