
Triumph TR7 / TR7 V8 and TR8 Buyers Guide

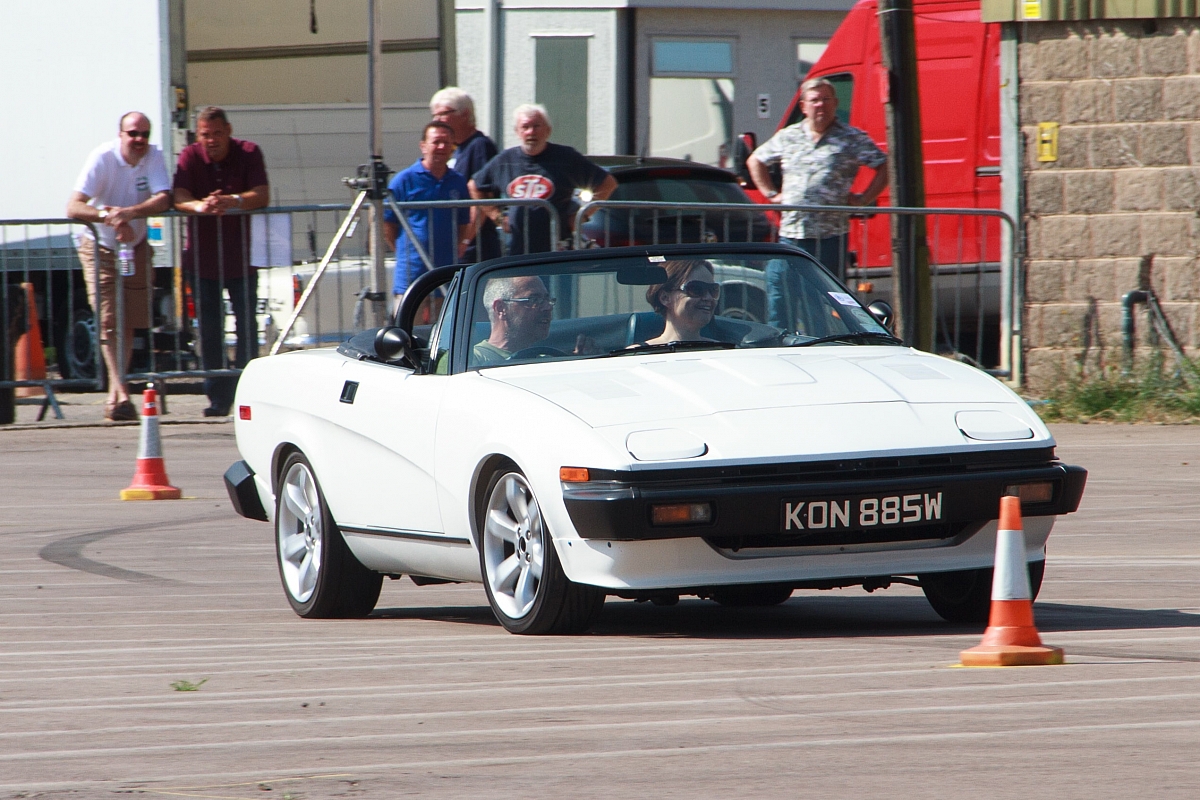
The first 'British Leyland' TR, totally different from earlier TRs. Engineering led by Spen King (technical director), with by Harris Mann. Simple engineering, with coil spring/beam axle rear suspension. Fixed-head coupes at first, convertible added in 1979. All cars with 8-valve/ 1998cc overhead-camshaft engine (105bhp in Europe, approximately 92 bhp in North America). Four speed gearbox at first, five speed box option from mid-1976 (standardised from 1978), automatic transmission option from 1975. Overdrive was never available. A 16 valve 'Sprint' version was proposed but killed off at pre-production stage. Assembly on three sites - Speke to 1978, Canley to 1980, then Solihull to 1981. Always controversial, but the best selling of all TRs. The V8-engined TR8 was it's short lived sister car. 112,375 cars built, 1975 to 1981.
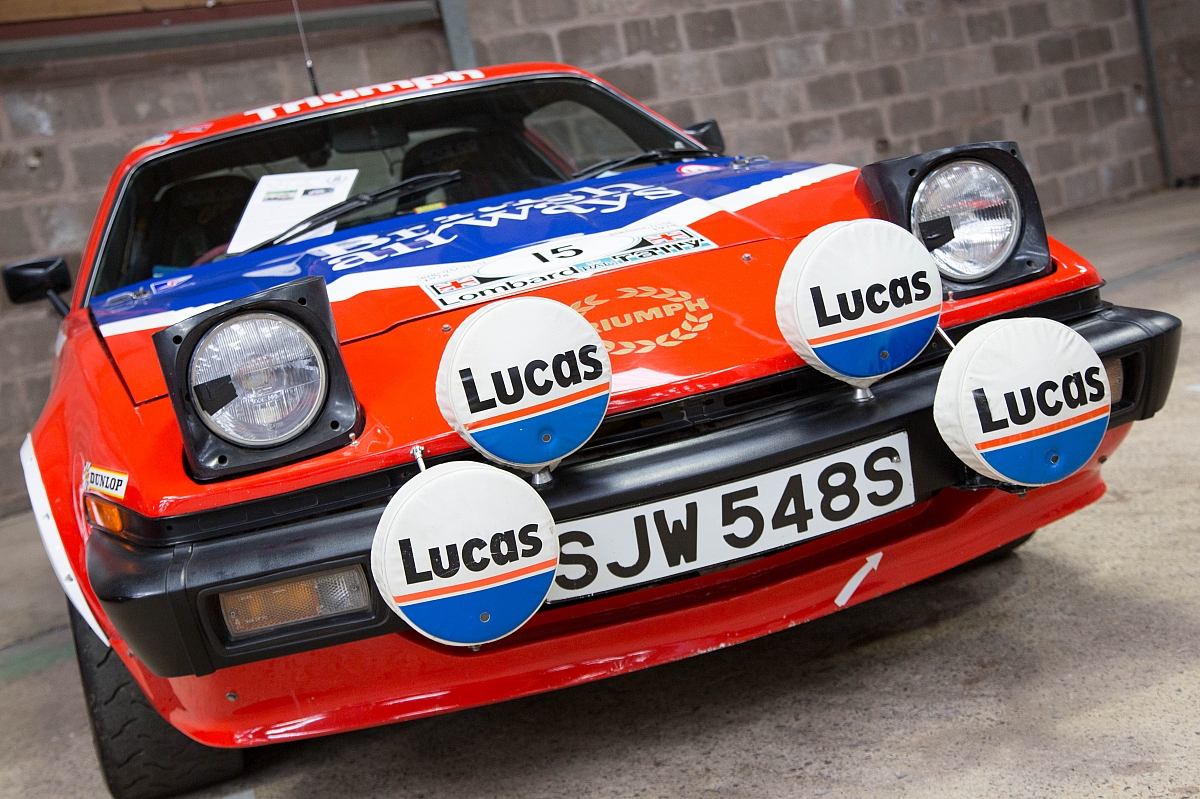
Originally intended only for North America in left hand drive. Due as FH Coupe in 1978, delayed for two years by industrial action. Effectively a 133bhp/3528cc V8-engined version of the late model TR7, with five speeds or automatic, and beefed up brakes and suspension. Stromberg carburettors at first, with Lucas injection for Califormia, then injection for North America in 1981. Intended for UK/Rest Of World sale from late 1981 but killed off as all TR assembly was wound up. Few, very few pre-production UK spec. TR8s built at the factory, but in later life hundreds more created from TR7s by specialists. 2722 cars built 1979 to 1981.

FACTS & FIGURES
Manufactured
TR7 - September 1975 to Summer 1981
TR8 - Autumn 1979 to Summer 1981
Production Figures TR7
Produced for the Home Market 27000
Produced for the Export Market 88000
Totals 115000
Production Figures TR8
Produced for the Home Market - 30
Produced for the Export Market - 2570
Total - 2600
Basic Price TR7
TR7: Coupe £5229, Conv. £5045
Basic Price TR8
$11000
Engine Details TR7
4 Cylinder 90.3mm x 78mm 1998cc, SOHC engine. 105bhp at 5500 rpm, M/torque - 119lbs/ft at 3500 rpm, Twin SU Carbs .
Engine Details TR8
TR8 8 Cylinder V8 - 88.9mm x 71mm 3528cc engine. 133 bhp at 5000 rpm, Efi TR8 - 148bhp. M/torque - 174lbs/ft at 3000 rpm, Twin Strombergs CDSET'S.
Suspension Details
Front: Independent by Macpherson struts with coil springs, anti roll bar, telescopic dampers.
Rack and pinion steering
Rear: Live axle, coil springs, radius arms, anti roll bar and telescopic dampers
Wheels: Light Alloy 185/70 x 13 tyres Rim width 5.5"
| PERFORMANCE DATA | TR7 | TR8 |
|---|---|---|
| Mean max. speed | 110 mph | 120 mph |
| 0 - 30 mph | 3.2 s | 2.9 s |
| 0 - 50 mph | 6.7 s | 6.2 s |
| 0 - 60 mph | 9.1 s | 8.4 s |
| 0 - 90 mph | 22.98 s | 18.8 s |
| Standing ¼ mile | 17 s | 16.3 s |
| Overall Fuel Consumption | 26.4 mpg |
18.5 mpg
|

TR7 / TR8 Frequently Asked Questions
Q: How can I fit a modern DIN stereo to my '7, they seem to be too deep.
A: --
My personal taste is to avoid the latest generation systems with the multimedia displays in old cars, so I use an old Clarion with manual tune radio, & a quality cassette player. This comes with a high power integral amp (needed to overcome the other sound system). This has the added advantage of not attracting magpie thiefs by its appearance, but still has sufficient juice to be useful.
Note you will need to modify the aperture slightly to get a DIN sized unit to fit properly.
Many options exist to mount speakers, a good example is the possibility of making a replacement rear window ledge (in a coupe) that is strong enough to mount speakers to. The doors are also generous enough to mount good sized speakers in.
--
I always fit the Clarion single CD players in my cars, they fit well and sound superb through Sony speakers, I have fitted 4 speakers in my FHC and they sound even better in my TR7 DHC which I have just sold. I had a Clarion cassette player and that looked well and sounded good, there seems to be quite a lot of good quality units that will fit so look around and choose.
--
I fitted a late model Clarion MP3/CD player & after trimming the size of the entry hole found it all fitted remarkably well. The CD performs ok @ 45 deg although max recommended is 30deg. It has not skipped yet anyway!
--
FWIW, I had the same problem recently with my own car, seems someone tried before and cracked the fascia (luckily it was minor and easily and invisibly repaired with good old superglue).
What I ended up doing was dispensing with the steel collar altogether and using the plastic stereo surround itself (the bit that hides the gap between collar, fascia and case) to hide this fact... You may have to fabricate clips of some sort to hold the plastic surround securely in place, I used two very small (and long) countersunk screws, black in colour of course, screwed into the bottom right and left hand corners of the plastic surround itself. It's almost invisible, (and not as bodged as it sounds!), and the screws wedge in nicely between the dash and the stereo case and allow easy removal if need be without mutilating the car itself in any way.
The original tape deck (which I have safely stuck in a box somewhere was actually held in place with two hard foam blocks, so the new one is snugly held in place by these and doesn't bounce about. Be VERY careful though not to block any vents with this arrangement, and stay well clear of the heatsink at the back of the new stereo-this may get hot in use, as may the front panel...
--
The cheapo JVC CD tuner (£99ish) works fine mounted in the dash, mines been in 2 different 7's now & is still working fine, mind you it did give up the ghost when the heater matrix leaked all over it, managed to dry it out & clean it & got it repaired under warranty, sweet!!
--
Mine was easy... ish, had to take the centre console out, move the wiring harness as far back as it could go, then trim the aperture for the radio as far as it would go width-wise. Then chop a bit off each side of the fascia of the radio (and in my case a little off the securing brackets so it just fitted in) it was tight, but can be done. It also of course depends how deep the unit is, but normally its' down to tidy wiring to get the depth required.
--
I was talking to a radio supplier at Stoneleigh Triumph show and he said that older radio types aren't as deep. Remember back in 76 there were no cassettes let alone CD players! You need to shop around for a second hand "period" radio. If anyone knows where you can buy a new radio that will fit, I'd be interested to know.
--
There are plenty of the older shorter type of car radios and cassette players around, problem is though that nearly all are AM, so actually are pretty useless for radio reception these days. I had been looking for an FM set for ages, finally found one at Stoneleigh. I would not want to fit a modern set in my DHC, even if I could get one short enough, would rather have an older one that looks roughly period, and more importantly valueless!
--
My New DAB/CD/Radio fitted fine :-) popped into Halfords and they offered one up to see if it fitted in before i bought it. It's a Woodstock DAB 52.
--
I've just spent 3 hours installing an ISO loom into the glove box of my TR7. This will enable me to have a modern head unit in the glove box (secure and subtle), with a dummy period unit in the 1 din opening. I have considered wiring the switch on the dummy unit to the ISO loom, thus turning the new stereo on with the old one, but I'm scared I'll leave it on and drain the battery!
My next project is to buy a modern stereo control stalk, loom and stalk adapter (for whichever head unit I decide to fit). This will allow me to control the stealth stereo from the steering wheel, with ease ;)
Q: Why have my indicators stopped blinking?
A: Assuming that the bulbs are all OK and that the problem is the indicators all glowing continuously it is most likely to be earth related. Try cleaning up the earth connections in the boot. The earth points behind the front headlights crud up over time and you may want to drill a new clean one to connect to the mounting bolts of the front indicator units. If this fails then the flasher unit can easily be replaced (hidden away behind the dash and wired via an "L" shaped connector). This is worth doing even if the hazard flashers work!
Q: What after market Alloy wheels will fit my TR7/8?
A: There are a number of considerations. The Pitch Circle Diameter (PCD), which is the distance between the centres of the opposite studs (on a 4-stud wheel), must be 95.25mm (3.75") for the wheels to fit onto the studs. The offset (usually marked on the wheel as "ET") is 25mm for TR7 wheels. It is possible to fit wheels with a smaller offset but spacers may be required (e.g. MGF wheels which have an ET20 offset). Montego/Maestro alloy wheels will also fit. The wheels are located on the centre hub, and NOT by the wheel nuts. Hence the diameter of the centre hole is also important. Many replacement wheel manufacturers can use an adapter to vary the diameter of the locating hole. Diameter: 14", 15", 16" and 17" diameter wheels can fitted (although standard TR7 alloys are only 13"). Width: 6" or 6.5" wheels are often fitted, but there can be wheel arch clearance problems with 7" ones.
Q: What is the screaming noise from the front pulley area when I rev my engine?
A: Could be a loose fan belt, which you can easily diagnose and adjust by the bracket attached to the alternator. Otherwise it is most likely the viscose coupling bearing on the fan. This is designed to "slip" so that the fan is limited to a lower speed than the pulley that drives it. The plastic fan can be easily unbolted from the viscous coupling at the centre and that can be replaced. Ideally by a new one as a second hand unit may easily develop the problem again soon.
Q: What Oil should I use in my TR7/8 5 speed gearbox?
A: Triumph originally recommended an 80W hypoid oil, but subsequently changed the recommendation to ATF (automatic transmission fluid) to counter balking when the 'box is cold. ATF however is very thin oil and many owners now use a modern synthetic multi-grade oil, which offers better protection and is thinner when cold. A semi-synthetic 75/90 gear oil may be the best compromise.
Q: How do I free up my stuck Clutch?
A: Suggestions from past answers on the TR7/8 forum to this common question:
"The way I've freed off stuck clutches in the past is to warm the engine up, switch off then engage 1st and making sure there is nothing in the way turn the key and start the engine. As it accelerates jump on Brakes and clutch together, never fails, also never fails to frighten all around!"
"You can try getting the revs up to a speed that the car will go in gear without the use of a clutch (you need to be in a safe wide open place for this) and then gently sliding the car into gear (if it grates you may need to adjust the revs to achieve this) as the car moves forward brake hard - the car will stall but sometimes it will break the clutch free. Can't stress enough this is potentially dangerous so you should make sure you have the car in a wide open space with nothing to hit or get hit by. The sensible and safe way is to take the clutch apart, also if you are not very careful you may damage the gearbox so take your time and if in doubt don't!"
"Put rear axle up on stands, put in gear, start and warm, apply brakes with the clutch depressed (length of wood is useful). Warm up engine, stop engine, put in gear, with clutch depressed start engine - need space for the car to drive and brakes off.
I had a really stubborn one that I eventually freed by a start in gear followed by a lot of hard accels and breaking with the clutch depressed. Luckily I have a car park at the end of my road so I had the room."
"1. Start the car in gear by turning the engine over via the key with foot off the brake and handbrake not applied.
2. Then apply a light pressure to the accelerator pedal to rev the engine (to prevent stalling) and hit the brake pedal hard (the choke full on will probably be enough).
This can all be done in a matter of seconds and approx one vehicle length."
"I tried all of the above when my clutch used to stick, the best way is warm up the engine first, raise the back end with a trolley jack so the back wheels are off the ground, engage gear, start engine, apply a few revs, hit the foot brake. Repeat 2 or 3 times and the clutch will free, easy!"
Q: Can I tow my TR7 project or breakdown home?
A: There is an important issue with towing TR7s:
It seems this box, although it is a manual, shouldn't be towed. There is an oil pump inside which ought to be driven. Practically this means that the propshaft must be removed prior to towing or it must be towed with the rear wheels in the air. Failure to do this over any distance can mean major damage to the gearbox.
Q: What are the differences between the different types of Rover V8 engine?
A: Basics first -
Engine size is stroke * pi * bore rad^2
Size Bore Stroke Size
3.5 88.9 71.1 3530
4.4 88.9 88.9 4414
3.9 94.04 71.1 3950
4.2 94.04 77 4278
4.0 94.04 71.1 3950
4.6 94.04 82 4556
The 4.4 is an Australian type with a long stroke and taller block - it's rare in the UK so maybe best ignored. The 4.2 is a hybrid engine with a foot in two camps.
We then have two families of engine, 3.5 / 3.9 and the 4.0 / 4.6
The 3.9 is a 3.5 engine with a wider cylinder bore providing the extra capacity. The pistons etc are wider, but the crankshaft has the same stroke, heads, valves, covers and ancillaries are all the same except for the fact that later models of engine tend to be stiffer or improved, but you can use any parts from either engine on the other except for the pistons and the block itself as these define what type it is.
The 4.0 engine has the same cylinder dimensions as the 3.9 and you can use the same pistons, heads, etc. The 4.6 engine is the same as the 4.0 except that it has a longer stroke, 82 mm instead of 71.1 mm therefore you have to use a crankshaft with this larger offset.
To further complicate your choices, the 4.0/4.6 family has revised ancillaries so it does not need the same crankshaft and therefore the crankshafts are not interchangeable between the two families of engine. This is not a problem because the 4.0/4.6 family also use a cross-bolted block that has different sized main bearings in which the crank rotates so they're different on two accounts.
The 4.2 engine is a bit like the 3.5 family but with a longer crankshaft and with some of the 4.0 family ancillaries, it is a bit like a 4.6 before all the improvements had been developed.
The basic point of these differences is:
You can easily convert a 3.5 into a 3.9 engine. You may be able to convert a 4.0 into a 4.6 engine by using replacement crankshaft, con rods (not sure about that one).
You cannot easily convert any other sort of engine into anything else although you may be able to make a 3.9 into a 4.2 using a longer throw crank from a real 4.2 engine, but it might need some machining to alter the front of the crank to fit the front cover on a 3.5 / 3.9
You can use most ancillaries from any sort of engine on any other, except that the later 4.0 family have a different front arrangement, no distributor, etc. The inlet manifold ought to fit, exhaust manifolds, and so forth.
Q: I have steering wheel wobble at 50-60mph, what can I do?
A: Unfortunately this seems to be a common problem without a definitive solution, but there are a number of things that will help!
Brake discs: "I had the same problem and it turned out to be that one of the discs was not mounting correctly. Try taking them off and cleaning all the mounting faces. It worked for me."
eometry: "Can I suggest you get a dial gauge (DTI), a couple of good rulers, plumb line etc. and spend a couple of days measuring everything. Compare both sides and another car if possible. It sounds like a lot of work but you will find that something is bent or out of place. As long as you are careful this is a lot more accurate than your local tyre fitters tracking gauge and you can check more things."
Steering rack: "I also had this problem and reckon the power rack cured it. Some of the aftermarket recon manual racks aren't very good. Any slop will cause the wobble. Also TR7's have a very loose torque setting on the stub axle which doesn't help things."
Location of wheels: "In my never ending quest to eliminate the steering wobble on my car. I have made a small modification resulting in a dramatic improved, to almost total elimination of the fault (on my car anyway). I have machined two hard plastic/nylon centre rings, which fit tightly over the flange of the wheel hub and locate again tightly in the centre hole of the wheel giving the wheel a true centre prior to tightening the nuts. I got the idea from a modern car with aftermarket alloy wheels (unfortunately alloy wheel suppliers don't do a ring for the 7)"
Q: How can I remove corroded cylinder head studs?
A: The hardest part of most head removal activities is the removal of the studs. They often corrode in place because they are steel in an aluminium head, resulting in dissimilar metal galvanic corrosion.
What makes the Triumph TR7 head particularly difficult to remove is the fact that the studs are angled in the head. If they were parallel, DIY enthusiasts would almost certainly have an easier time of it.
Here are suggestions from past answers on the TR7/8 forum to this common question:
1. Stud removal on the TR7 engine can be very difficult, and you should assume from the outset that they are going to fight you every step of the way. Naturally the first thing to do use Plus Gas or some such and let it soak in, as far as it will anyway. Then get a good quality stud remover such as the Sykes Picavant unit that Halfords sell. Hopefully that will do the trick. If it does then when you fit the new studs use some anti-seize compound on the thread
2. Failing that, a nut can be welded on the end of the stud to let you use a spanner (and a lot of sweat) on it. (Tried locking two nuts together initially but they just kept slipping up and down the thread no matter how hard I tightened them together)
If the stud is still siezed, you could hoist the car by it's cylinder head and let gravity have a go, although I recommend leaving this one to a garage!
3. I welded a nut on the end of the studs but using much force managed to snap the stud lower down level with the top of the head. I found the best way was to use a large breaker bar and socket on the stud and to apply slight force in both directions. After several minutes of this a slight movement in the stud (just a couple of mm) could be felt. Continuing the back and forward motion increases the movement until the stud could be removed.
4. I had to insert wedges at either end of the head to force it up the remaining stud (ouch). When it had lifted enough I could cut the stud and remove the head. The part of the stud remaining in the head could be easily drifted out. The part in the block was then removed with no further trouble.
Compiled by Malcolm Paris.
Disclaimer:
The TR7/8 FAQ contains ideas and suggestions from TR7/8 Forum and TR Register members. Neither I, nor the TR Register, can vouch for or warrant the accuracy, completeness or usefulness of any of the answers. The advice given does not necessarily express the views of myself, or of the TR Register.
